自製菜脯 【人間珍品】在家做天然鹹香 How to Preserved Daikon Radish

你的關注給我最大的鼓勵,訂閱肥丁 YouTube 頻道
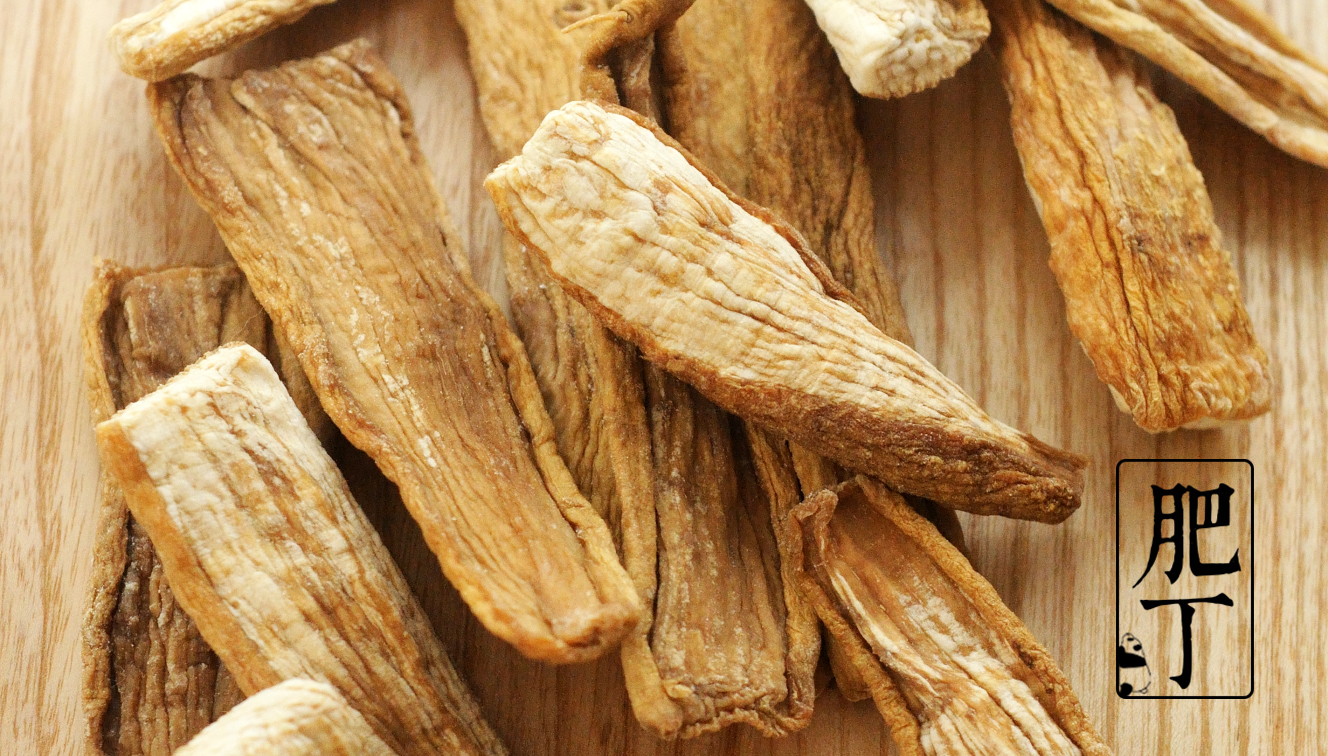
菜脯是醃製過的蘿蔔乾,現代商品化為了縮短時間,巿場上很多含有色素或添加物的「偽菜脯」,純手工製作老菜脯工藝,已經越來越難找了。菜脯的脆脆口感是用厚切蘿蔔或整個蘿蔔重壓乾燥後而來的,薄切或乾燥速度太快,口感會變得乾柴,沒經過重壓也不會爽脆。我在條件有限的家裡製作菜脯,分 2 次加鹽,可減少用鹽過量讓蘿蔔死鹹,同時讓鹽發揮防腐的作用。鹽量不能太少,否則沒有防腐的效果。這個鹽度比較合理,單吃鹹味有點重,配粥或煎蛋剛剛好,不需要另加其他鹹味調料。菜脯蛋搭配粥,超合拍,消食開胃。
純手工陳年菜脯現在很難買到,我這做了10 個月已經忍不住取出來品嚐,10 年的黑金那是多麼不容易,10 年後我都不知道會不會繼續在網絡上分享囉~
去年趕著做份量太少 做完我就後悔了~

【菜脯 ♦ 材料】
- 白蘿蔔 Daikon Radish 1310 g
- 粗鹽 (第一次) Coarse Salt 26 g (約白蘿蔔的 2%)
- 粗鹽 (第二次) Coarse Salt 54 g (約白蘿蔔的 4%)

【菜脯蛋 ♦ 材料】
- 雞蛋 Egg 3 顆
- 菜脯丁 Minced Preserved Daikon Radish 50 g
- 蔥花 Minced spring onion 4 大匙
- 原蔗糖Demerara Raw Cane Sugar 1 大匙
- 甜椒粉或辣椒粉 Paprika 1/4 小匙
- 鰹魚粉Bonito Flakes Powder 1/4 小匙
- 櫻花蝦或蝦米 Sakura Shrimp 1/4 小匙
- 麻油 Sesame Oil 1 小匙
- 現磨白胡椒粉 Freshly Grated White Pepper


【菜脯 ♦ 做法】
1. 用清水把外皮洗涮乾淨,量度白蘿蔔的重量,製作菜脯不用去皮,若有色班或破損的削去,去蒂
2. 半切,切成 4 份成粗長塊,加入粗鹽,精鹽幼鹽溶化速度太快,入味太快會讓菜脯非常鹹,所以不適合醃蘿蔔,第一次加入粗鹽,均勻塗抹在蘿蔔表面,將蘿蔔漬醃到出水,倒去苦水,上壓重物,靜置一夜讓蘿蔔滲出更多水份
第 2 天
3. 靜置一晚的蘿蔔脫出更多水份,倒去苦水,蘿蔔開始縮小
4. 預備第二次醃漬的粗鹽,均勻塗抹在蘿蔔表面,我家不能曬到太陽,為了方便放在戶外陰乾,在透氣的籃子裡放竹墊,蘿蔔整齊排列,使其均勻受壓,壓上重物繼續進行脫水,放在戶外陰涼通風處,陰乾

第 3 天
5. 取走重物,蘿蔔翻面,觀察蘿蔔的脫水狀態
第 4 天
6. 蘿蔔繼續脫水縮小,表面開始變皺
第 5 天
7. 持續晚上重壓,日間陰乾約 5 天,我的蘿蔔乾已經壓不出水份,日間不需要重壓,陰乾或曬乾,晚上收回,重壓陰乾的蘿蔔乾,肉質有彈性,重新排列整齊,繼續重壓
第 6 天
8. 我家曬不到太陽,一定要在選在低溫,天氣乾燥的日子製作,室外溫度15°C,室內 20°C,相對濕度 60~70%,我住的地方濕潮日子較多,日間陰乾,晚上重壓的步驟,持續兩週,若能進行日曬,風味會更好
第 12 天
9. 竹墊沒有濕潤感,表示蘿蔔已經完全沒有水份,放入缸內,3 個月後開始褐化,若想製作老菜脯,放入缸中存放在乾燥通風處至少 5 年,封缸的老菜脯每年取出檢查,若發現有霉 就不能食用,發霉的原因,可能是放置地太潮濕,下次要另找比較乾燥的地點存放
10 個月後
10. 隨著蘿蔔存放時間越久,菜脯顏色越深,菜脯脫水後,只剩下原來重量的十份之一

【菜脯蛋 ♦ 做法】
1. 菜脯是時間沉澱蘊釀的美味,越陳越香,菜脯用清水浸泡約 20 分鐘,注意清洗皺紋之間,自己做的比較乾淨安心,擠乾水份
2. 菜脯切丁,也可用調理機打碎,鍋裡不加油,下菜脯翻炒一下,炒出香味起鍋備用
3. 自製甜椒乾或辣椒乾或辣椒粉,鰹魚乾,櫻花蝦或蝦米,用研磨機打磨成粉
4. 混合雞蛋、蔥花、菜脯丁、DEMERARA 原蔗糖、鰹魚櫻花蝦乾粉及麻油,輕輕攪拌均勻,不要加入過多空氣,最後加入現磨白胡椒粉
5. 平底鍋裡加入少許油,用薑塗刷均勻,中火加熱至泛起油紋
6. 倒入蛋液,煎蛋餅,先不要攪拌或翻面,小火煎至半熟,傾斜鍋子,讓上層未熟的蛋液流向底下,小火煎至蛋餅邊緣凝固
7. 我喜歡像歐姆蛋般捲起來,整塊翻面需要很熟容易過老,因為疫情,煮熟一點比較安全,熄火加蓋悶 1 分鐘,起鍋,皮微脆肉嫰
 [:en]
[:en]
Your attention is the greatest encouragement to me, subscribe to Beanpanda’s YouTube channel
Preserved radish is made from dried radish, and in modern commercialization, many “fake preserved radish” products containing dyes or additives have appeared in the market in order to shorten the production time. The traditional handcrafted preserved radish is becoming harder to find. The crispy texture of preserved radish comes from using thickly sliced or whole radishes dried and compressed. Thinly sliced radishes or fast drying will result in a dry and tough texture instead of a crispy one. When making preserved radish at home with limited conditions, salt is added twice to reduce the excessive saltiness of the radish and allow the salt to act as a preservative. The salt quantity cannot be too little, otherwise, there will be no preservative effect. The saltiness level is reasonable; it may be slightly salty when consumed alone, but it pairs just right with congee or fried eggs without needing additional salty seasoning. Preserved radish and egg paired with congee make a perfect combination, aiding digestion and whetting the appetite.
It’s very difficult to find traditionally handcrafted aged preserved radish now. I couldn’t resist taking it out to taste after making it for 10 months. It’s not easy to achieve the “black gold” of 10 years. I don’t even know if I will continue to share it on the internet after 10 years~
I regretted making too little of it last year after rushing to make it.
【菜脯 ♦ 材料】
- Daikon Radish 1310 g
- 粗鹽 (第一次) Coarse Salt 26 g (約白蘿蔔的 2%)
- 粗鹽 (第二次) Coarse Salt 54 g (約白蘿蔔的 4%)
【菜脯蛋 ♦ 材料】
- 雞蛋 Egg 3 顆
- 菜脯丁 Minced Preserved Daikon Radish 50 g
- 蔥花 Minced spring onion 4 大匙
- 原蔗糖Demerara Raw Cane Sugar 1 大匙
- 甜椒粉或辣椒粉 Paprika 1/4 小匙
- 鰹魚粉Bonito Flakes Powder 1/4 小匙
- 櫻花蝦或蝦米 Sakura Shrimp 1/4 小匙
- 麻油 Sesame Oil 1 小匙
- 現磨白胡椒粉 Freshly Grated White Pepper
【菜脯 ♦ 做法】
- Wash the outer skin clean with water. Measure the weight of the white radish. There is no need to peel the radish to make preserved radish. If there is discoloration or damage, remove it, and cut off the stem.
- Cut the radish in half, then cut each half into 4 thick long pieces. Add coarse salt. Fine salt dissolves too quickly and can make the radish too salty, so it is not suitable for marinating radishes. The first time, add coarse salt and evenly spread it on the surface of the radish. Let the radish marinate until it releases water, then pour off the bitter water, place a heavy object on top, and let it sit overnight to allow the radish to release more water.
Day 2
- After sitting overnight, the radish releases more water, so pour off the bitter water, and the radish starts to shrink.
- Prepare the coarse salt for the second marinating. Evenly spread it on the surface of the radish. Since my home cannot be exposed to direct sunlight, for convenience, I dry the radish outdoors in the shade. I place a bamboo mat in a ventilated basket, neatly arrange the radishes, and apply even pressure to ensure they are uniformly pressed. Continue to dehydrate by placing a heavy object on top and let it dry outdoors in a cool, shaded, and ventilated area.
Day 3
- Remove the heavy objects, turn the radish over, and observe its dehydrated state.
Day 4
- The radish continues to dehydrate and shrink, and the surface begins to wrinkle.
Day 5
- Continue to apply heavy pressure at night. After approximately 5 days of shade drying, my radish can no longer be pressed for water during the day. It does not need to be pressed during the day; it can air-dry or sun-dry. At night, bring it in, press the radish dry, and rearrange it neatly.
Day 6
- My house doesn’t get much sunlight, so it’s essential to choose cool, dry days for this process. The outdoor temperature is 15°C, indoor temperature is 20°C, and the relative humidity is 60-70%. There are many humid days where I live. The steps of shade drying during the day and heavy pressure at night should be continued for two weeks. If possible, sun-drying would enhance the flavor.
Day 12
- If the bamboo mat doesn’t feel damp, it means the radish is completely dry. Place it in a jar. After 3 months, it will start to brown. If you want to make preserved radish, store it in a dry, ventilated place for at least 5 years. Check the sealed preserved radish annually. If mold is found, it’s not safe to eat. Mold may occur if it’s stored in a too damp place. Next time, find a drier place for storage.
10 months later
- As the radish is stored for a longer time, the preserved radish becomes darker in color. After dehydration, only one-tenth of the original weight remains.
【Preserved Radish Omelette ♦ Recipe】
1. Preserved radish is a delicious product of time and fermentation, becoming more fragrant with age. Soak the preserved radish in water for about 20 minutes, paying attention to clean between the wrinkles. It is safer and cleaner to make it yourself and squeeze out the water.
2. Cut the preserved radish into small cubes or use a food processor to break it into smaller pieces. Stir-fry the preserved radish in a pot without adding oil, until fragrant, then set aside.
3. Make your own sweet pepper flakes, dried chili flakes, or chili powder, as well as dried bonito flakes, dried sakura shrimp, or dried shrimp, by grinding them in a grinder.
4. Mix together eggs, chopped scallions, diced preserved radish, DEMERARA raw cane sugar, ground bonito and sakura shrimp, and sesame oil. Gently stir until well combined, being careful not to incorporate too much air. Finally, add freshly ground white pepper.
5. Heat a small amount of oil in a flat-bottomed pan, and brush the pan evenly with ginger. Heat over medium heat until the oil shimmers.
6. Pour the egg mixture into the pan and cook the omelette. Do not stir or flip it immediately. Cook over low heat until half-cooked, then tilt the pan to let the uncooked egg flow to the bottom. Continue cooking over low heat until the edges of the omelette are set.
7. I like to roll it up like an omelette. Flipping the whole omelette can easily overcook it, and due to the pandemic, it’s safer to cook it a bit more. Turn off the heat, cover the pan, and let it sit for 1 minute. Remove from the pan, and the omelette should have a slightly crispy skin and tender filling.
電動重力感應胡椒研磨器 https://s.click.taobao.com/fHxgpvu
 [:]
[:]


謝謝分享做法。關於第二次加鹽的時間點想請教一下: 若是戶外日照充足,請問是否第一天將苦水倒掉後先拿到戶外曝曬後,晚上收進屋後再抹第二次鹽? 還是說可以一次把鹽都抹足後,隔天拿到戶外曝曬?
除了暴曬,其他步驟不變
你好,想請問下,如果改用喜馬拉雅粉紅鹽醃蘿蔔會不會有影響(例如不夠鹹而無法起到防腐作用)?因為屋企還有粉紅鹽,就想用粉紅鹽試下。謝謝。
喜馬拉雅粉紅鹽可以用
不過現在溫度太高
要待天氣寒冷的時候才能製作唷
全年最冷的時候就是最佳時機
謝謝! :)
關於溫度,我也想請教,因為我住在馬來西亞,溫度和濕度都偏高(年尾會涼少少,平均溫度都是31-32度,濕度差不多70%),製作步驟方面應該如何調整較好?
例如重物壓乾或曬乾的時間需要縮短嗎?
這個菜脯的做法必須要在冬天
重壓不曬陰乾
馬來西亞的溫度不適合這種做法
若你家中的冰箱空間足夠大
可以放在冰箱裡進行重壓
原來如此!謝謝肥丁解說!:)