網友跪求 等了好久的豆瓣醬 5 年後再見 Homemade Doubanjiang Recipe / Broad Bean Chili Sauce

你的關注給我最大的鼓勵,訂閱肥丁 YouTube 頻道
醬者,百味之將帥,帥百味而行。醬料是很多料理不可缺少的調味料,尤其像著名的麻婆豆腐與擔擔麵,沒了豆瓣醬便沒了靈魂。一年前很多粉絲想看豆瓣醬,而肥丁也想吃豆瓣醬,結合傳統和我自己的經驗,實驗在有限的條件的家裡蘊釀美味的可行性,計劃便這樣展開了。

豆瓣醬主要由辣椒與豆麴發酵,形成一種複雜而富有層次感的醍醐味。用來製豆麴的豆,可以是黃豆和蠶豆,兩者有著不同的鮮香,我選蠶豆,想看看別於用黃豆發酵醬油,會產生怎麼樣的鮮香。蠶豆蛋白質豐富,氨基酸種類齊全,若是蠶豆症 G6PD 就別碰蠶豆了。
麴菌是發酵的靈魂,對發酵非常重要,直接影響醬料的味道。我找到一種做醬專用的釀造發酵菌種 ~ 醬品曲精。用的量非常少,餘下來的下次實驗豆鼓。

另一個重點是辣椒發酵,可能很多人不知道辣椒本來有甜味的,只是被辣椒素的刺激蓋過去,發酵後的辣椒會產生一種複雜多元的香氣,原本刺鼻的辣椒變得柔和醇厚。辣椒的品種和辣度可自己挑選,朝天椒自問沒有這個擔量,混合一些辣味較輕的大紅辣椒。我把製作辣椒醬的經驗套用到豆瓣醬裡,辣椒和果泥一起發酵,味道果然是不同凡響。
辣椒果泥發酵,發酵辣椒一定要選新鮮,無腐壞的。蒂頭暗綠發霉,變軟皺皮,就是不新鮮了。

海鹽是很容易被忽略的配料,豆瓣醬有怎麼樣的鹹味就依靠鹽了,肥丁這次是下血本,出動在家裡囤積一段日子的「給宏得海鹽」SEL DE GUERANDE,鹹味圓潤輕柔,不搶食材原味。用的時候捨不得,吃的時候更捨不得。溫和的鹹辣鮮味,入口後在嘴裡擴散開來的香氣,真的極具魅力。

或許你會覺得發酵食物工序多,但是與花里胡哨的烘焙相比,我更愛發酵食物的養生天然,只要完成最初種菌、混合等步驟,接下來是麴菌工作。
我一直叨念為甚麼還沒夠一年,結果年末旅行和搬家,花了不少時間。有空來開封的時候,已經是一年零兩個月了。開封的一天,醬料香氣四溢,口水開始分泌了,發酵豆瓣醬散發濃厚溫醇的香氣,不枉一年的等待,雖然這一年也沒管它。風味跟巿售的速成醬料,完全不能相提並論,巿售一些速成豆瓣醬,把黃豆煮熟,直接加入化學調味和辣椒混合,再以澱粉增稠,只有一種簡單的鹹辣味道。

【材料】
- 朝天椒 Facing Heaven Chilli 200 g
- 大紅辣椒 Big Red Chilli 900 g
- 蘋果泥 Apple 600 g
- 蠶豆 Fava Beans 1000 g
- 海鹽 Sea Salt 100 g
- 低筋麵粉 Cake Flour 300 g
- 醬油麴(醬品曲精) Doubanjiang Starter 1/2 小匙

醬品曲精 https://item.taobao.com/item.htm?spm=a1z09.2.0.0.562c2e8dxShFNG&id=567294543846&_u=hi7vjvv06e3
- 製麴當日溫度 24.5°C
- 相對濕度 54%
【發酵辣椒果泥】
1. 大紅辣椒,朝天椒去蒂,洗乾淨,瀝乾水份至表面沒水珠,切丁,朝天椒太辣,我用剪刀剪碎直接放入攪拌杯,不刺激眼睛和手,用調理機打成辣椒泥
2. 蘋果去蒂去皮,切丁,用調理機打成果泥
3. 辣椒泥、蘋果泥放入消毒過的玻璃瓶內,拌勻,用酒精噴濕廚房紙巾,抹乾淨玻璃瓶壁,蓋好,發酵 4 ~ 5 天 (室溫 25°C),第二天開始,濃稠的果泥出現變化,發酵產生氣體,使果渣浮起來,每天打開攪拌一下。若表面十弓一產生白的酒酵花,用乾淨的湯匙刮走就行了,原本刺鼻的辣椒變得柔和醇厚

【製作豆瓣麴】
4. 浸泡蠶豆的容器要大一些。蠶豆用清水浸泡 8 ~ 10 小時,倒去泡過的水,掰開
5. 鋪平在大的淺盤上,讓蠶豆均勻接觸熱力,蒸 10 ~ 15 分鐘,蠶豆快熟,不用蒸很久。瀝乾,表面不殘留多餘的水份。蠶豆要熟透,菌種才容易滲透生長到整顆蠶豆裡面,用湯匙壓就碎,表示蠶豆已經熟透
6. 放在鋪有烘焙紙的竹簸箕上,簸箕放在晾架上,有利散熱
7. 蠶豆降溫至約 35°C
8. 醬品曲精混合麵粉 ,拌勻,倒入麵粉,拌勻
9. 麵粉混合蠶豆,讓麴菌均勻覆蓋在每一顆蠶豆上。麴種的孢子發芽期在約 4~6 小時,發芽期要注重保溫,蓋上棉布,放入烤箱,溫度維持在 30~34°C。我用蒸烤爐,環保式上下火 35°C。發酵 6 ~ 12 小時
10. 蠶豆發熱,溫度若上升至 38°C,便要翻麴

【12 小時後】
11. 取出打開綿布通風,開始看見菌絲發芽,蠶豆表面的菌絲變厚,形成白白一層。孢子發芽期間,蠶豆自身發熱,若蠶豆溫度上升至 38°C,便要進行翻麴,分開搓散結塊的蠶豆,再攤平,蠶豆開始發熱後,不用放回烤箱,放在室溫,蓋綿布繼續發酵

【24 小時後】
12. 菌絲生長旺盛,蠶豆持續發熱,留意蠶豆溫度,過程中超過 38°C 便要翻麴降溫
【48 小時後】
13. 麴菌顏色開始由白色轉為黃綠色,小心掰開結塊的蠶豆,注意麴菌溫度,不用蓋布,平鋪散熱散水氣,讓菌絲充份生長滲入蠶豆

【72 小時後】
14. 整顆蠶豆表面變成黃綠色,完成發酵後,蠶豆不會再發熱,溫度回復室溫,自然乾燥 1 ~ 2 天,成為豆瓣麴

15. 發好的豆瓣麴,用冷水洗去蠶豆表面的菌絲,存留在蠶豆裡的麴菌酵素,繼續分解蠶豆裡的,蛋白質和脂肪酸,成富含風味的小份子物質,加上耐鹽性的酵母菌,發酵出複雜香醇的風味
16. 重複沖洗 2~ 3 次,瀝乾
17. 肥丁家沒有日曬的條件,平鋪在乾燥機的烤盤上,45°C 乾燥 6 ~ 8 小時。若家裡能曬大陽,也可曝曬變乾,蠶豆變乾後,會聞到像豆鼓般的香氣
18. 蠶豆麴放入消毒過的玻璃瓶,倒入發酵好的辣椒泥,混合拌均,每週攪拌一次。發酵辣椒和豆瓣麴一起發酵,香氣是非常驚艷的,最少半年以上才能感受到
19. 加入海鹽,攪拌均勻
20. 用白酒噴濕的廚房紙巾,抹乾淨玻璃壁,第一個月,每週攪拌一次,最少發酵 1 年
【第 1 週】
21. 為拍攝清晰,我用大的玻璃罐,平常釀製醬料最好裝 7~8 分滿,減少醬料外露的平面面積
【第 2 週】
22. 蠶豆開始被分解,變成醬泥,沾在玻璃瓶壁的醬料,分散了菌種的數量,接觸空氣落菌,容易產生白毛,一出現便要立刻攪拌,抹平表面,用力向下壓緊,玻璃瓶裡壁一定要清潔乾淨
【第 3 週】
23. 白毛減少,發酵情況良好,將面層與缸底層的醬料攪翻均勻
【第 4 週】
24. 放入烘焙紙,往下壓緊,讓烘焙紙緊貼醬料,烘焙石放入保鮮袋裡,密封袋口。放入瓶裡緊壓醬料,防止醬料表面被空氣落菌污染,之後不用每週攪拌,等待就是了,若沒有阻隔空氣接觸,表面持續長白毛很容易變壞
【3 個月】
25. 白毛沒再出現,發酵良好,液體醬汁滲出
【4 個月】
26. 隨著發酵時間醬料變成紅褐色,借助微生物的力量,釀造出不同凡響的美味,發酵食物沒辦法縮短製程
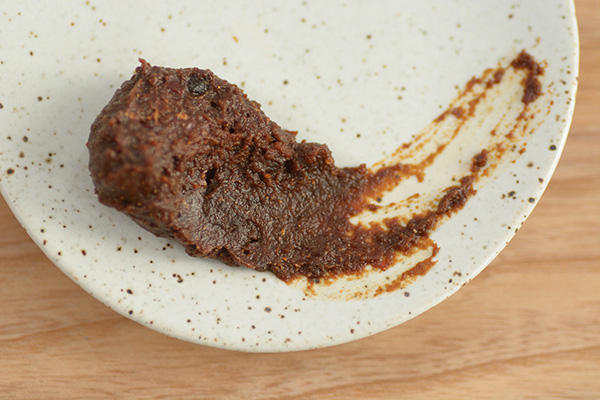
【 1 年】
27. 醬料滲出褐紅色醬汁,鮮美醇厚。食用前進行分瓶,分瓶前,所有容器和用具要消毒,消毒的方法,請參考「清潔與消毒」影片
28. 取出烘焙石,為方便取出食用,放入搪瓷或玻璃瓶裡,避免使用塑料或金屬容器,壓緊擠出空氣,食用罐需要冰箱保存,麴菌團結就是力量,質量越大,抗菌力越強,沾在邊上的醬料,落單變成少數,最容易受雜菌污染,而影響整罐,一定要抹乾淨 才不容易變壞,更好的保存醬料
29. 貼上製作日期,放進冰箱冷藏,餘下來的豆瓣醬,讓它繼續室溫發酵,取一個較小的玻璃瓶消毒乾淨,放入餘下的豆瓣醬,玻璃瓶壁清理乾淨,鋪上烘焙紙,壓入烘焙石,讓烘焙紙緊貼醬料,釀造 1 年,基本風味形成了
30. 這瓶我打算 5 年後開封,期待更醇厚飽滿的味道,2025 年再見
Make sure to subscribe so that you don’t miss out on my future video
Sauces are the commanders of flavor, leading a hundred flavors in their wake. They are indispensable in many dishes, such as the famous Mapo Tofu and Dan Dan Noodles, where the soul of the dish lies in the Doubanjiang sauce. A year ago, many fans requested a recipe for Doubanjiang sauce, and I myself love it too. Combining tradition with my own experience, I began to experiment with the feasibility of making delicious Doubanjiang sauce in the limited conditions of my home, and thus the plan was launched.
Doubanjiang sauce is mainly fermented from chili and fermented soybean paste, creating a complex and layered flavor. The beans used to make the soybean paste can be ysoybeans or broad beans, each with a different fresh aroma. I chose broad beans, wanting to explore a different fresh aroma from using yellow soybeans to ferment soy sauce. Broad beans are rich in protein and have a complete set of amino acids, but those with G6PD deficiency should avoid them.
The mold is the soul of fermentation and critical to the flavor of the sauce. I found a brewing fermentation strain specifically for making sauce – Jangpum Kwangjong. Only a small amount is needed, with the remainder reserved for the next experiment to make fermented bean paste.
Another key point is the fermentation of chili peppers. Many people may not know that chili peppers naturally have a sweet taste, which is masked by the stimulation of capsaicin. Fermented chili peppers produce a complex and diverse aroma, and the once pungent chili becomes soft and mellow. The variety and spiciness of the chili peppers can be selected according to personal preference. As I didn’t have the courage to use extremely spicy peppers like the “Facing Heaven” variety, I mixed in some mildly spicy red peppers. I applied my experience of making chili sauce to making Doubanjiang sauce, fermenting the chili peppers and bean paste together, and the flavor was indeed remarkable.
Fresh chili peppers are essential for fermenting chili paste. The fermented chili peppers must be fresh and not spoiled. If the stem is dark green and moldy, and the pepper is soft and wrinkled, it is no longer fresh.
Sea salt is an easily overlooked ingredient, but it is essential for the saltiness of Doubanjiang sauce. For this recipe, I spared no expense and used my stash of “Sel de Guerande” sea salt that had been sitting at home for a while. The salt has a round, smooth, and gentle saltiness that doesn’t overpower the natural flavors of the ingredients. It’s hard to let go of it when using it, and even harder to let go of when eating the finished dish. The mild, salty, spicy, and fresh taste, coupled with the aroma that spreads throughout the mouth upon consumption, is truly irresistible.
You might think that the fermentation process involves many steps, but compared to the complicated process of baking, I prefer the natural and healthy benefits of fermented food. After completing the initial steps of culturing and mixing, it’s all up to the mold to do its job.
I’ve been impatiently waiting for my Doubanjiang sauce to ferment for a year, but with traveling and moving, it took longer than expected. When I finally opened the jar a year and two months later, the aroma of the sauce filled the air, and my mouth began to water. The fermented Doubanjiang sauce emitted a rich, warm, and mellow fragrance, making the one-year wait worthwhile, even though I didn’t attend to it during that time. The flavor is incomparable to the store-bought instant versions that are made by cooking soybeans, adding chemical seasonings and chili, and thickening with starch. The homemade sauce has a complex and unique taste that cannot be replicated by any shortcuts.
【Ingredients】
- Facing Heaven Chilli 200g
- Big Red Chilli 900g
- Apple Puree 600g
- Fava Beans 1000g
- Sea Salt 100g
- Cake Flour 300g
- Doubanjiang Starter 1/2 tsp
Buy Koji Kin Spores at Amazon https://amzn.to/3O0KnWX
【Fermented Chili Paste】
1. Remove the stems from the Big Red Chili and Facing Heaven Chili. Wash them clean and drain off any excess water. Cut the chilies into small pieces. As Facing Heaven Chilies are too spicy, I use scissors to cut them directly into a blender, which avoids irritations to the eyes and hands. Blend the chilies into a paste using a blender.
2. Remove the stems and skin from the apple, cut it into small pieces, and blend it into a puree using a blender.
3. Mix the chili paste and apple puree in a sterilized glass jar. Use an alcohol-sprayed kitchen towel to wipe the inside of the jar clean, and cover it with a lid. Ferment the mixture for 4-5 days at room temperature (25°C). On the second day, the thick paste will show changes, and gas will be produced during fermentation, causing the fruit residue to float up. Open the jar once a day and stir the mixture. If white mold appears on the surface, scrape it off with a clean spoon. The once pungent chili paste will become soft and mellow.
【Making Doubanjiang Starter】
4. Soak the fava beans in a large container filled with water for 8-10 hours. Drain the water and break the fava beans apart.
5. Spread the fava beans evenly on a large shallow plate, and steam them for 10-15 minutes. The fava beans should be cooked through to make it easier for the mold to penetrate and grow inside. Use a spoon to press the fava beans, and if they are easily crushed, it means they are cooked through.
6. Place the cooked fava beans on a bamboo sieve lined with parchment paper and rest it on a cooling rack to allow heat to escape.
7. Allow the fava beans to cool to about 35°C.
8. Mix the Doubanjiang starter and cake flour until well combined, and pour the mixture over the cooled fava beans. Mix well.
9. Mix the flour and fava beans together until the mold is evenly spread over each fava bean. The spores of the mold will germinate in about 4-6 hours, and during this period, it’s important to maintain warmth. Cover the container with a cotton cloth and place it in an oven, maintaining a temperature between 30-34°C. I use a steam oven with eco-mode upper and lower heat set at 35°C. Ferment for 6-12 hours.
10. If the temperature rises to 38°C, turn the fava beans over to prevent overheating.
【After 12 hours】
11. After 12 hours, remove the cotton cloth and allow air to circulate. You will begin to see white mold growing on the surface of the fava beans. During the spore germination period, the fava beans will generate heat on their own. If the temperature of the fava beans rises to 38°C, turn them over to prevent overheating. Separate the clumps of fava beans, flatten them out, and cover them with a cotton cloth to continue fermentation at room temperature. There’s no need to put them back in the oven once they start to generate heat.
【After 24 hours】
12. The mold growth is vigorous, and the fava beans continue to generate heat. Monitor the temperature of the fava beans, and if it exceeds 38°C, turn them over to cool down.
【After 48 hours】
13. The color of the mold begins to change from white to yellow-green. Carefully break apart any clumps of fava beans, and watch the temperature of the mold. There’s no need to cover them with a cloth, just spread them out to allow for better air circulation, cooling, and moisture release. This will help the mold to grow and penetrate the fava beans better.
【After 72 hours】
14. After 72 hours, the surface of the fava beans will have turned yellow-green, indicating that the fermentation process is complete. The fava beans will no longer generate heat, and the temperature will return to room temperature. Allow the fava beans to dry naturally for 1-2 days until they become Doubanjiang starter.
15. Rinse the surface of the mung beans with cold water to remove the mycelium, then the koji enzymes that remain inside the mung beans continue to break down the proteins and fatty acids, forming small flavorful molecules. Add salt-tolerant yeast to ferment and produce a complex and rich aroma.
16. Repeat the rinsing process 2-3 times and drain the water.
17. Since the Fat Ting family does not have the condition for sun-drying, spread the mung beans on a baking tray in a dryer and dry them at 45°C for 6-8 hours. If you can dry them in the sun, the dried mung beans will emit a fragrant aroma similar to that of fermented bean paste.
18. Put the mung bean koji into a sterilized glass jar, pour in the fermented chili paste, mix well, and stir once a week. The aroma produced by the fermentation of chili paste and mung bean koji together is amazing, and it takes at least half a year to feel it.
19. Add sea salt and mix well.
20.Use a kitchen towel moistened with white wine to wipe the glass walls clean. Stir once a week during the first month, and ferment for at least one year.
【Week 1】
21. To ensure clear visibility for filming purposes, I used a large glass jar. For normal sauce-making, it is best to fill the jar only about 7-8 tenths full to reduce the surface area of the sauce exposed to the air.
【Week 2】
22. The fava beans begin to break down and turn into a paste. The sauce that sticks to the sides of the jar will disperse the number of microorganisms, which can come into contact with the air and cause white mold to grow. If you notice any white mold, immediately stir the sauce, smooth the surface, and press it down firmly to prevent the mold from growing. It’s crucial to keep the inside of the jar clean.
【Week 3】
23. The amount of white mold decreases, and the fermentation is going well. Stir the surface layer and the bottom layer of sauce evenly.
【Week 4】
24. Place baking paper on top of the sauce and press it down firmly to make it adhere tightly to the sauce. Put baking stones in a sealed plastic bag and press them tightly against the sauce inside the jar to prevent the surface of the sauce from being contaminated by airborne mold. After that, there’s no need to stir the sauce every week. Just wait patiently. If the sauce is not protected from exposure to air, mold may continue to grow on the surface and spoil the sauce.
【3 months】
25. No more white mold appears, and the fermentation is going well. The sauce starts to release a brownish-red liquid.
【4 months】
26. With time, the sauce gradually turns into a reddish-brown color, and with the help of microorganisms, it acquires a unique and delicious flavor. The fermentation process cannot be shortened.
【1 year】
27. The sauce releases a rich and flavorful brownish-red liquid. Before consuming the sauce, divide it into smaller jars. All containers and utensils should be disinfected before dividing the sauce. Please refer to the “Cleaning and Disinfecting” video for disinfection methods.
28. Remove the baking stones and transfer the sauce to a porcelain or glass jar for easy access. Avoid using plastic or metal containers. Press out the air, and store the jar in the refrigerator. The larger the mass of the mold, the stronger its antibacterial properties. The sauce that sticks to the sides of the jar is more susceptible to contamination by airborne mold and can affect the entire jar, so it must be removed before storage. This will help to preserve the sauce better.
29. Label the jar with the production date and store it in the refrigerator. The remaining Doubanjiang starter can continue to ferment at room temperature. Disinfect a smaller glass jar and transfer the remaining sauce to it. Clean the sides of the jar, lay baking paper on top of the sauce, and press baking stones against it. Allow it to ferment for one year, and the basic flavor should have developed by then.
30. I plan to open this jar in five years and look forward to a richer and fuller flavor. See you in 2025!


师傅的技术超级厉害,耐心非常好,可以等5年,我做的梅酒等一年就觉得很久了。
豆瓣酱发酵的材料不知在哪个网上能买到,温度也不易掌握,一般人可能做的不好吃。
可以跟生醬油加在一起沾著吃嗎?
豆瓣醬夠鹹味
我一般只會在做菜調味時才會加醬油
我買不到蠶豆,只能用黃豆,請問泡發黃豆之後需要去除黃豆的皮嗎?(因為影片中 fava beans 是 skinless 的)
請問醬品曲精的英文是什麼?
最近才注意到肥丁的影片,覺得很喜歡,謝謝!
還有,可以用醬油種麴代替醬品曲精嗎?兩者之間有差別嗎?
謝謝您耐心回答
Oh so the first half year without salt?
步驟第19
the page is not translatable into English so I cannot read…
I have done the English translation, you can take a look now.
Thank you! but it seems the step 15-20 are missing from the page…?
Oh Sorry I have put the wrong numbering! It’s fixed
Thank you, and I’m reading it 5 times and still don’t know when you add salt… I’m really but did you mean you add salt at the step 19?
I am sorry that 15~20 is missing before. I have checked again and you could find it now
Thank you for all your work!! And wow, so it is really after half year that you add salt. Amazing!
辣椒酱不加盐 不会发酸吗
不會,後面有加鹽的