愈臭越好吃⁉️街邊港版臭豆腐👍經典復刻 The smellier, the better⁉️ Street-side Hong Kong-style stinky tofu 👍 Classic revival
肉類臭滷水的分解能力似乎比植物為主的湯底更為強大,台式臭鹵水的發酵時間平均為六週,而港式則僅需三週。港式發酵時間更短,食用時搭配辣椒醬和甜醬,這是我童年時代經常品嚐的滋味,令人感到激動。隨著時代的變遷,以往沿街叫賣的臭豆腐小販逐漸被取代,這道小吃日益減少,因為傳統的發酵液氣味獨特且難以接受,大多數人都會感到難以忍受,這就是當前臭豆腐愈發難以獲得的原因。
上次我嘗試了復刻台式家庭臭豆腐,今天我將製作在香港臭名昭著的港式臭豆腐。各地製作臭豆腐的方法和食用方式各有不同,臭豆腐之所以氣味奇特,主要是因為發酵過程中發揮了關鍵作用。這種臭滷液採用開放式的自然釀造方法,並不直接添加菌種,而是利用容器進行自然發酵,在環境中讓其自行腐爛分解。

港式臭豆腐發酵液的主要材料通常為海鮮、老姜及陳皮,每家均有各自的秘方。我小時候的鄰居專門製作臭豆腐,他的配方中包含魷魚。
由於豆腐浸泡在臭滷水中,細菌及霉菌的作用下,豆腐中的蛋白質會逐漸分解,並產生如胺 Amine 及肽 Peptide 等特有臭味的分解產物,形成具有獨特氣味及海綿狀結構的臭豆腐。


港式臭豆腐◤材料
- 冷凍魷魚 Frozen squid 100 g
- 新鮮海蝦 Fresh prawns 270 g
- 老薑 Old ginger 300 g
- 麻油腐乳 Salted Bean Curd Cubes in Brine with Sesame Oil 130 g
- 飲用水 Drinking water 1000 ml
- 板豆腐/硬豆腐 Firm Tofu / Hard Tofu 340 g (可製作 9 件)

◤做法
我購買了冷凍切片魷魚,以飲用水解凍,倒去退冰的水。
❶ 新鮮海蝦需去除頭頂尖刺、眼睛及觸鬚,並去掉蝦腳。蝦頭從中間剪開,因其內含的鰓、心、胃、肝和胰藏可能殘留重金屬,而死後會滋生細菌,故蝦頭內臟必須徹底清理。從頭至尾的第三節去除蝦腸,蝦肉連殼剪成小塊。
❷ 老姜的生育期約為十個月,此時根莖已完全成熟,姜齡越老姜辣素越多,製作發酵液的效果更好。老姜去皮,用飲用水洗淨後切成塊
❸ 建議使用能密封的玻璃瓶作為發酵容器,以避免發酵液與容器產生化學反應。玻璃瓶使用前必須清潔與消毒,具體方法可參考我的其他視頻。瓶裡放入海蝦和魷魚、老姜和麻油腐乳,將所有材料攪拌均勻。
❹ 加入放涼的飲用水。自來水含氯不利於發酵,故應提前煮沸並冷卻以去除氯氣,靜置一晚後使用。
❺ 臭滷水是有氧發酵,水不必加滿,瓶蓋上套上密封膠墊,藉以防止氣味散發出去,並在瓶子上標註製作日期,然後放入密封盒並存放於陰涼處,發酵約三週。
第2天
❻ 發酵液變成半透明的奶白色,開始出現濁度,依我所見,此次的氣味比上次以莧菜為主的台式臭豆腐更為濃烈。
第3天
❼ 即便不打開瓶蓋也能聞到一種難以形容的臭味,類似魚露酸敗的氣味,這時發酵液的顏色變為淺灰色,表面開始浮起細小泡沫,蝦肉和老姜也隨之浮起。

第6天
❽ 發酵液的顏色愈加深暗,底部的沈澱物增加,對於品嚐過港式臭豆腐者來說,這樣的氣味顯得相當熟悉。撹拌後,發酵液中會出現絮狀物。
第8天
❾ 此時的臭味有顯著變化,酸味減少,反而湧出煙薰的氣息,類似於污水的味道。
第9天
❿ 由於氣味實在太過特殊,甚至連貓咪都無法忍受,而我亦憂心鄰居會因此而投訴,因此後來我不再打開瓶蓋。
第22天
⓫ 底部的沈澱物不斷增加,氣泡減少,發酵液變為灰綠色,瓶底可見數個已被分解的碎片。港式臭鹵水經過三週即可使用
⓬ 打開時請務必佩戴口罩,做好心理準備,以應對這酵素的濃烈氣味。把發酵液倒入另一個消毒過的容器中,過濾殘渣。發酵後的殘餘可放入廚餘機處理,若無廚餘機則需用夾鏈袋包好。
浸泡豆腐
⓭ 最好選用含水分較低且質感最為堅實的板豆腐。將其直接倒入消毒過的容器內,確保豆腐浸泡於發酵液中後密封,外部套兩個夾鏈袋以避免氣味外溢,於室溫下存放約 6 小時。為了安全起見,我會將其放入冰箱,存放 12 個小時。未用完的發酵液可放入冰箱保存 1 個月,隨時取出浸泡豆腐食用。
⓮ 在油炸之前,需稍微乾燥以去除多餘的水分。我的鄰居所製作的臭豆腐呈現扁平長方形,這樣在油炸時能增加其脆皮的面積,若您喜愛整塊食用亦無妨。
⓯ 油炸前豆腐放在乾燥機進行風乾 75ºC約 1 小時,觸摸時有少許濕潤則可。用廚房紙巾平鋪在表面以吸取多餘的水分。如果豆腐未風乾,放入熱油中會造成油爆,極其危險。我會選用淺鍋冷油開始油炸,但當豆腐放入時卻散開了。
油炸
⓰ 使用茶籽油、酪梨油或米糠油,其煙點較高,適合高溫油炸。加熱油至 175ºC ,中火,網篩連同豆腐一起放入鍋中。豆腐垂直放置有助於防止粘鍋。豆腐入鍋後,油溫會驟降至 150ºC,調至大火,注意每個鍋和爐具的特性,應根據自家設備進行調整,最佳油溫應保持在 160~170ºC 之間。
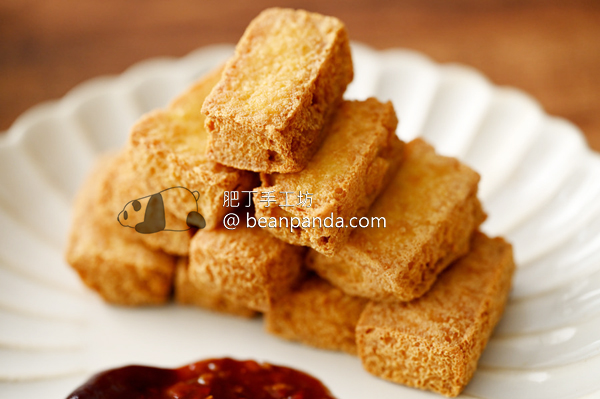
⓱ 豆腐放入後,切記不要翻動,隨著表面逐漸浮起細小的泡沫,需仔細觀察泡沫的變化。油炸約 5~6分 鐘後,豆腐表面開始形成脆皮,並隨之浮起,從小泡沫變成大泡沫,這是水分減少的指示。待至 7~8 分鐘時,豆腐表面的顏色應炸至金黃色,撈起後靜置一會,再開大火提高油溫,使油溫回升至 170ºC,豆腐再入鍋炸幾十秒,將使脆皮更香酥鬆脆,最後用廚房紙巾吸取多餘的油份。
⓲ 打開觀察豆腐的內部組織,小心燙傷,外層香酥鬆脆,內部則柔軟滑嫩,口感極佳。
The ability of meat-based stinky marinade to break down seems to be stronger than that of plant-based liquid. The fermentation time for Taiwanese stinky tofu is typically six weeks, while for Hong Kong-style, it takes only three weeks. The shorter fermentation time in Hong Kong means that it is often served with chili sauce and sweet sauce, which brings back exciting memories of flavors I often tasted during my childhood. As times have changed, the street vendors selling stinky tofu have gradually been replaced, and this snack has become less common, as the distinctive aroma of traditional fermentation liquid is difficult to accept. Most people find it hard to endure, which is why stinky tofu has become increasingly hard to find.
The last time I tried to replicate Taiwanese homemade stinky tofu, today I am going to make the notoriously famous Hong Kong-style stinky tofu. The methods of making and consuming stinky tofu vary from place to place, and the unique odor of stinky tofu primarily results from the fermentation process. This stinky marinade uses an open natural brewing method without directly adding strains; instead, it fosters natural fermentation in a container, allowing it to decompose in the environment.
The main ingredients of Hong Kong-style stinky tofu fermentation liquid typically include seafood, old ginger, and dried tangerine peel, with each family having its own secret recipe. A neighbor of mine when I was young specialized in making stinky tofu, and his recipe included squid.
As the tofu is soaked in the stinky marinade, under the action of bacteria and mold, the proteins in the tofu gradually decompose, producing distinctive decomposition products like Amine and Peptide, resulting in stinky tofu with a unique aroma and sponge-like structure.
Ingredients
- Frozen squid 100 g
- Fresh prawns 270 g
- Old ginger 300 g
- Salted Bean Curd Cubes in Brine with Sesame Oil 130 g
- Drinking water 1000 ml
- Firm tofu / hard tofu 340 g ( 9 pcs )
◤Instructions
❶ I bought frozen sliced squid and thawed it with drinking water, then poured out the defrosting water.
❷ Fresh shrimp need to have the sharp spine, eyes, and antennae removed, and the shrimp legs should be discarded. Cut the shrimp head open in the middle, as it contains gills, heart, stomach, liver, and pancreas that may retain heavy metals and could breed bacteria after death, so the internal organs of the shrimp head must be thoroughly cleaned. Remove the shrimp intestine from the third segment to the tail, and chop the shrimp meat with shells into small pieces.
❸ Old ginger has a growing period of about ten months; at this time, the rhizome is fully mature, and the older the ginger, the more pungent the gingerol, resulting in better fermentation effects. Peel the old ginger, wash it with drinking water, and cut it into pieces.
❹ It is recommended to use a sealable glass jar as a fermentation container to avoid chemical reactions between the fermentation liquid and the container. The glass jar must be cleaned and disinfected before use; specific methods can be referenced in my other videos. Place shrimp, squid, old ginger, and fermented soybean oil into the jar and mix all the ingredients evenly.
❺ Add cooled drinking water. Tap water contains chlorine, which is not conducive to fermentation, so it should be boiled in advance and cooled to remove chlorine, and used after sitting overnight.
❻ The stinky brine is aerobic fermentation; the water does not need to be filled to the brim. Place a sealed gasket on the bottle cap to prevent odors from escaping, label the production date on the bottle, then store it in a sealed box in a cool place and ferment for about three weeks.
Day 2
❼ The fermentation liquid has turned semi-transparent and milky white and started to cloudy. In my observation, the smell this time is stronger than the previous Taiwan-style stinky tofu dominated by amaranth.
Day 3
❽ Even without opening the bottle cap, a vaguely indescribable foul smell can be detected, similar to the sour smell of fish sauce. At this point, the fermentation liquid has turned light gray, and small bubbles have started to float to the surface along with the shrimp meat and old ginger.
Day 6
❾ The color of the fermentation liquid becomes darker, and the sediment at the bottom increases. For those who have tasted Hong Kong-style stinky tofu, this scent feels quite familiar. After stirring, flocculent material appears in the fermentation liquid.
Day 8
❿ At this time, the stinky smell has significantly changed; the sourness has decreased, and instead, a smoky aroma has emerged, similar to the smell of sewage.
Day 9
⓫ The odor has become so peculiar that even cats couldn’t stand it, and I worry that my neighbors will complain, so I no longer open the bottle cap.
Day 22
⓬ The sediment at the bottom keeps increasing, and the bubbles decrease. The fermentation liquid has turned gray-green, with several decomposed fragments visible at the bottom of the bottle. The Hong Kong-style stinky brine can be used after three weeks.
⓭ When opening, be sure to wear a mask and prepare mentally to handle the intense smell of this enzyme. Pour the fermentation liquid into another sterilized container and filter out the residue. The remaining fermented matter can be disposed of in a food waste machine; if unavailable, wrap it in a ziplock bag.
Soaking Tofu
⓮ It is best to choose a firmer type of board tofu with lower water content. Pour it directly into a sterilized container and ensure that the tofu is submerged in the fermentation liquid. Seal it, and cover the outside with two ziplock bags to prevent odors from leaking out. Store it at room temperature for about 6 hours. For safety, I will place it in the refrigerator for 12 hours. Unused fermentation liquid can be stored in the refrigerator for one month, ready to soak tofu whenever desired.
⓯ Before frying, the tofu needs to be slightly dried to remove excess moisture. The stinky tofu made by my neighbor is flat and rectangular, which increases the surface area for crispiness during frying; however, feel free to keep it whole if you prefer.
Deep Frying
⓰ Use Camellia oil, avocado oil, or rice bran oil, as they have higher smoke points, making them suitable for high-temperature frying. Heat the oil to 175ºC over medium heat, and then place the tofu into the pan along with a strainer. Position the tofu vertically to prevent sticking. When the tofu is placed in the pan, the oil temperature will drop to 150ºC; adjust to high heat, keeping in mind the characteristics of each stove and pot, making adjustments based on your equipment. The optimal oil temperature should be maintained between 160-170ºC.
⓱ Once the tofu is added, do not flip it. As the surface begins to develop small bubbles, carefully observe the changes in the bubbles. After frying for about 5-6 minutes, the surface of the tofu will start to form a crispy skin and float up, with the small bubbles turning into larger ones, indicating moisture loss. At about 7-8 minutes, the surface color of the tofu should turn golden brown. Remove it and let it sit for a while, then increase the heat to bring the oil temperature back up to 170ºC, and fry the tofu for a few seconds more to ensure the crispy skin is more fragrant and crunchy. Finally, use kitchen paper towels to absorb the excess oil.
⓲ Observe the internal structure of the tofu with caution to avoid burns; the outer layer should be crispy and crunchy, while the interior remains soft and tender, resulting in an excellent texture.


