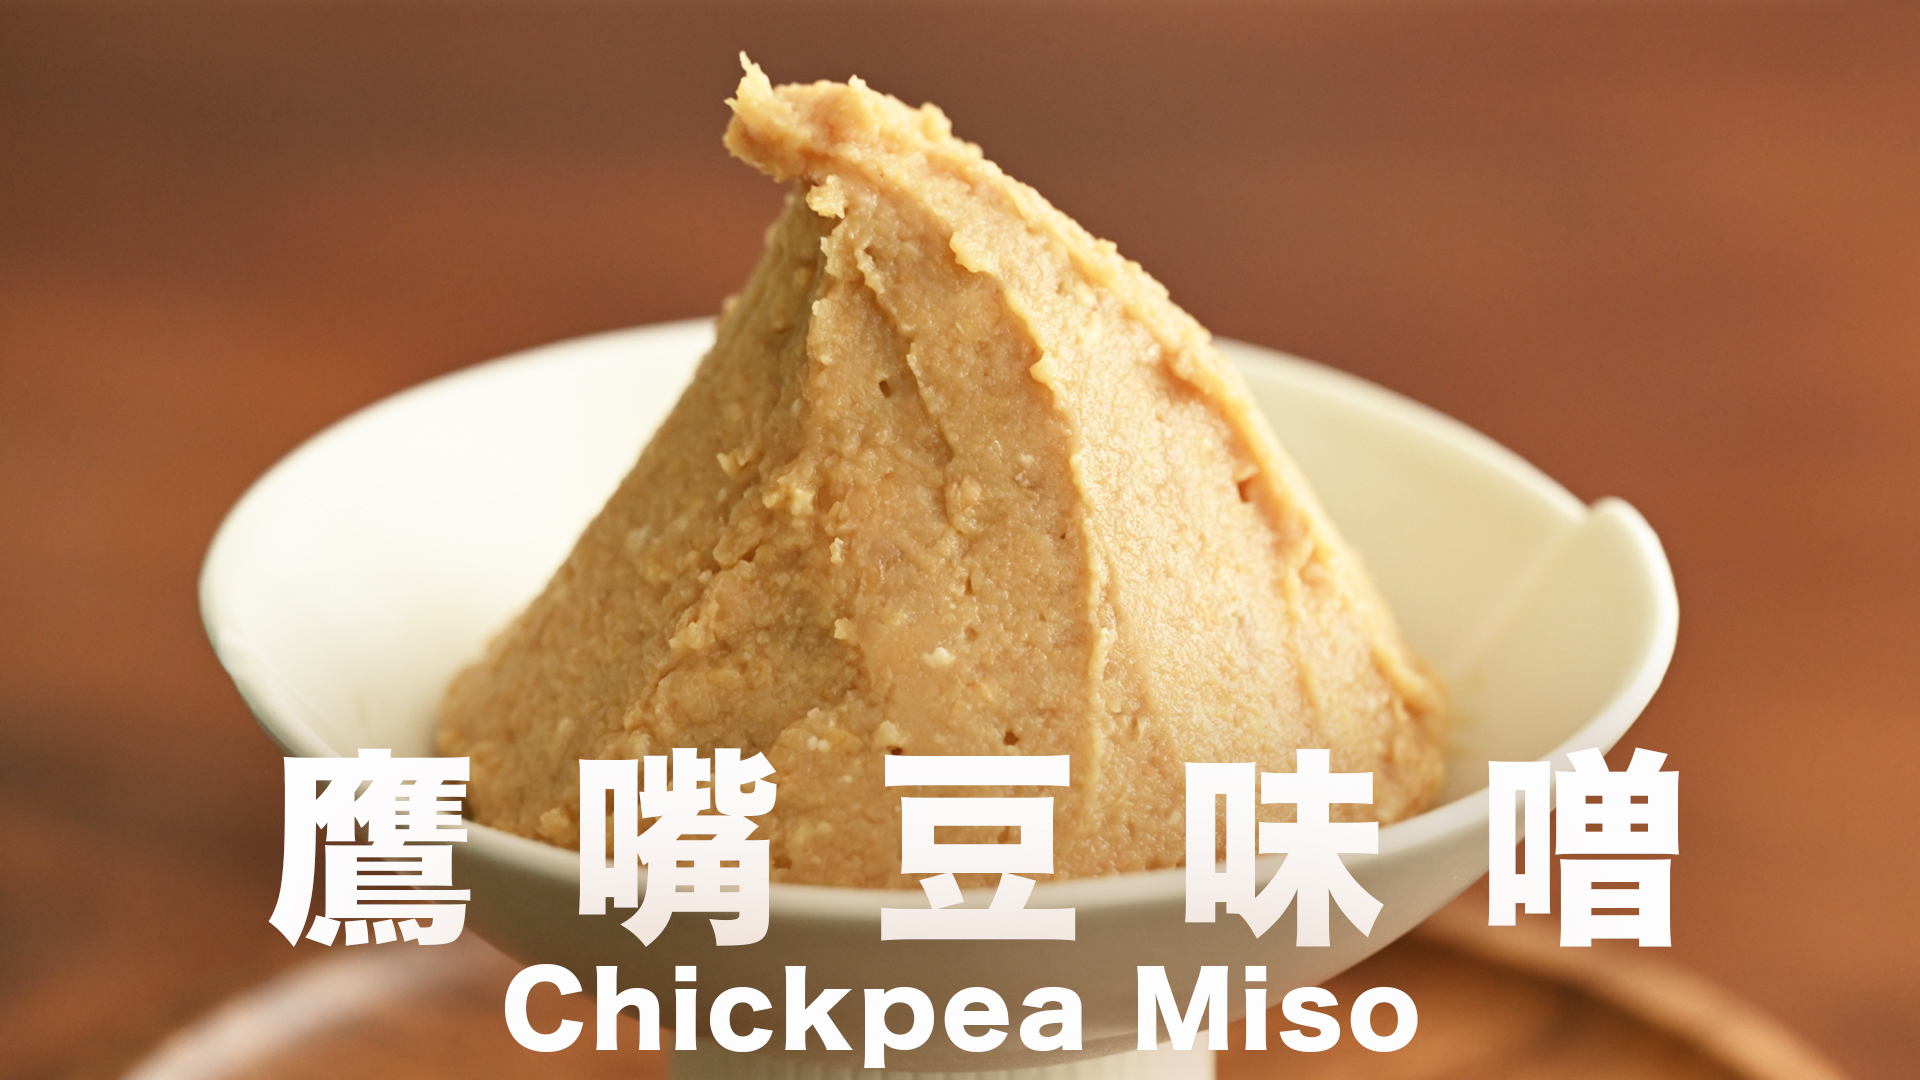
不要買味噌了⁉️鷹嘴豆味噌你試過嗎 ✅ 無大豆無麩質快速熟成 Quick & Easy Homemade chickpea miso〡Soy Free Gluten Free
味噌是由煮過的大豆、麴和鹽製成的發酵糊醬,其發酵過程分為兩個階段。首先,需讓米麴菌在米飯或大麥上轉化為麴,然後麴會產生強大的蛋白酵素和澱粉酵素,將大豆中的蛋白質和澱粉分解為胺基酸和單醣。在熟成過程中,野生酵母菌、乳酸菌和醋酸菌的參與為風味的形成增添了層次。對於有大豆過敏的寶寶,無需擔心,我們可以用其他原料來製作味噌。今天,我們將使用鷹嘴豆來取代大豆,製作出一款獨特而醇熟的味噌,且熟成時間將較大豆更短。
即使您從未嘗試製作肥丁頻道的發酵食品,希望您能對這個充滿魅力的發酵世界有更深入的了解。如果您欣賞此視頻,敬請訂閱、點贊、收藏及分享,以便持續我們的美味旅程。

免費訂閱肥丁 Youtube 頻道
多謝支持﹗
◤鷹嘴豆味噌♦︎材枓
- 鷹嘴豆 600 g
- 糙米麴或米麴 200 g
- 粗鹽 40 g (若長白霉再加 20 g)
- 礦泉水 360 ml(打豆泥)
製作前請務必看看如何進行清潔與消毒 https://beanpanda.com/143088
糙米麴做法 https://beanpanda.com/156242
自製米麴 https://beanpanda.com/110496

◤做法
❶ 鷹嘴豆需用清水徹底清洗,接著讓其在冰箱中浸泡12小時,然後挑出壞豆和未泡發的豆子,將泡過的水倒掉並放回碗中,無需再泡水,重新放入冰箱。接下來的2到3天,每天取出沖洗一次,每次沖洗後將其放回乾淨的碗裡,鷹嘴豆發芽通常需要1至4天,具體時間會因溫度和豆子的活力而異。催芽後的鷹嘴豆不僅更容易消化和吸收,還能帶來更高的營養價值。
❷ 在將鷹嘴豆上鍋蒸之前,再沖洗一次水,並在蒸鍋蓋上鋪一層柔軟的棉布,待水煮沸後改為中火蒸1小時。為使蒸氣充分充滿鍋內空間,需在鷹嘴豆中間紮一些洞。我將發酵用的搪瓷容器同時放入蒸烤爐中進行消毒,以100℃蒸1小時。無論是白色米麴還是糙米麴皆可用來製作味噌,兩種麴的製作方法均有詳細的視頻教程可供參考。由於鷹嘴豆的味道較黃豆為淡,因此此次我選擇自行製作的糙米麴,使用之前需提前將結塊的米麴捏碎。
❸ 時間已到,檢查鷹嘴豆的狀態。當鷹嘴豆可輕易捏碎時,即可開始接麴。若發現豆子變為褐色,應將其挑出。
❹ 將蒸熟的鷹嘴豆置入大碗中,撒上粗鹽,然後加入糙米麴,並攪拌均勻
❺ 將煮熟的鷹嘴豆放入調理機中,使用扭扭jar以便於處理濃稠食物,雖然其容量較小,因此建議將鷹嘴豆分為4至5份。開始時不應使用高速,可以利用暫停鍵(pulse)以幾秒打擊幾秒停頓,直至鷹嘴豆變為粗顆粒。然後逐漸加入清水,比例為每250克豆子60毫升水;如此一來,上層的鷹嘴豆便不會因缺水而空轉。
❻ 礦泉水或純淨水皆可使用,然而需注意,自來水所含氯會抑制發酵,因而若使用自來水,必須先煮沸後置於室溫冷卻過夜,待到第二天方可使用。味噌在發酵容器中的濕度相當重要,若豆泥過於乾燥,則混合物的流動性將不足,豆渣間的空隙過大,將可能促進其他細菌的繁殖,這會抑制米麴菌的生長,影響整體的生物或化學反應。若豆泥過於濕潤,則微生物及酵素可能過於活躍,導致無法控制的微生物大爆發。當鷹嘴豆打成細膩順滑的豆泥後,即可準備裝盒。
❼ 取出手掌大小的豆泥,輕輕地塑成球狀,像傳接球一般以兩手交替拍打,努力將豆泥中的空氣驅逐。然後,如同輕柔地拋接珍貴的寶物般,將其輕輕放置於保存容器的底部,確保每一團豆泥之間無空氣存在,以維持彼此之間的親密關係。我對此步驟特別喜愛,太爽了超解壓。掉落在桌面的豆碎不應放回盒中
❽ 當豆泥入盒後,需在表面覆上一層烘焙紙,讓其緊貼味噌的表面,並以手從上至下施加壓力,此為關鍵一步,以便愈加緊密,減少空氣空隙,阻止其他細菌的入侵,防止雜菌在內部滋生。利用玻璃杯墊施加重壓,任何不會發霉的重物均可置於其上,並務必記得將罐口擦拭乾淨,以避免霉菌滋生。
❾ 置入烤箱中,在60℃的恆溫環境下發酵8小時。若所加鹽量過少,豆泥表面可能會長出白霉;此時無需擔心,應先挖除白霉部分,隨後增加鹽的比例,再將其放回烤箱進行60℃恆溫發酵24小時。
❿ 若要求不高,發酵36小時的鷹嘴豆味噌亦可品嘗;然而,對於我這樣的發酵愛好者而言,淺酵的味道難以滿足我的味蕾,因此我將此盒味噌靜置於冰箱中,讓其在低溫環境下緩慢發酵整整一年,以期待更為深邃的風味。

◤15個月後開封
⓫ 與風味獨特的黃豆味噌相比,鷹嘴豆製成的味噌散發出更為清新的魅力。其質地較為柔軟,口感適中,鹽分含量亦恰到好處,絕不會令您感到過於鹹膩,堪稱大豆及麩質過敏者的優質替代選擇。
⓬ 我喜歡在早晨或經歷忙碌後享用一碗此類味噌,然而,自製味噌的挖取過程則稍顯繁瑣。特別是家裡發酵的味噌,所使用的工具需經過徹底消毒,保證無水無油,不僅挖取後須加以清洗。
⓭ 將味噌製成一顆一碗湯的份量的味噌丸,以便計算與使用。有一種海鮮湯包,內含乾燥昆布、乾蝦、乾蔥及魚粉、蟹粉增味劑等。如您與我一樣對品質要求嚴格,亦可自製鮮味粉,將高湯粉與味噌配料混合後,用手搓揉成丸形,煮湯時十分方便。

◤基礎味噌丸(份量10個@20g)
- 味噌 180 g
- 自製鮮味粉 12 g https://beanpanda.com/21688
- 乾昆布 8 g
- 乾燥蔥 1 g
◤基礎味噌湯(1人份)
- 基礎味噌丸 1 顆
- 熱水 200 g
- 鷹嘴豆豆腐或你喜歡的配料
◤味噌丸的基本作法
❶ 將味噌及自製鮮味粉與乾燥海藻放入調理盆中,純植物性食材的朋友可選用香菇粉和昆布粉。使用多種食材可以加強提鮮效果,然後將乾燥蔥粒加入其中。用刮刀仔細攪拌以避免結塊,接著分成十等份,搓揉成球狀,每顆約二十克。味噌丸亦可包裹外衣,如白芝麻、天然蔬果粉或咖喱粉等,輕輕滾動後,食材自然會附著於味噌表面,調味的同時增添高級感。也可以加入各種乾燥蔬菜。
❷ 將成品放入搪瓷盒中並抽出空氣,以防串味。由於味噌本身較軟,難以成形,加入鮮味粉可吸收多餘水分,使味噌的質地變得更為結實。鮮味粉亦擔任調味的角色,猶如添加了湯底,進一步提升鮮味。
❸ 將其放在冰箱冷藏,隨時可供使用。鷹嘴豆味噌湯的製作方法為:將熱開水煮至沸騰後熄火,然後放入味噌丸。熱水的量可依個人喜好調整,並攪拌至完全融化為止。加入自製的鷹嘴豆豆腐,下次我將分享詳細製作方法。這道味噌湯便捷可口,且並不單調,搭配不同調料的小變化,便可令生活增添趣味。這鷹嘴豆豆腐在煮湯後口感嫩滑,颇为美味。


◤鷹嘴豆味噌湯♦︎春♦︎材料
(春夏秋冬味噌丸沒加昆布)
- 基礎味噌丸 1 顆
- 紅火龍果粉 滾球包裹味噌丸即可 https://beanpanda.com/51316
- 熱水 200 ml
- 昆布絲 1小撮
- 自製紫蘇梅乾 (去籽、切碎)1顆 https://beanpanda.com/13546
- BB蘆筍 10~15根
- 庄内板麩皮(麩質過敏可省略)


◤鷹嘴豆味噌湯♦︎夏♦︎材料
- 基礎味噌丸 1 顆
- 熱水 200 ml
- 炒紅洋蔥丁 20 g
- 玉米粒 2 大匙
- 玉米荀 4 根切丁
- 肥丁自製番茄醬 1 大匙 https://beanpanda.com/88245
- 肥丁自製蒜粉 1/4 小匙 https://beanpanda.com/16769
- 乾蔥粒 適量點綴


◤鷹嘴豆味噌湯♦︎秋♦︎材料
- 基礎味噌丸 1 顆
- 肥丁自製咖喱粉 滾球包裹味噌丸即可 https://beanpanda.com/12891
- 無糖豆漿 200 ml
- 南瓜(切丁 5 mm ) 80 g
- 鴻喜菇 10 根
- 巴馬臣起司 適量點綴


◤鷹嘴豆味噌湯♦︎冬♦︎材料
- 基礎味噌丸 1 顆
- 白芝麻 滾球包裹味噌丸即可
- 熱水 200 ml
- 山藥 30 g 切片
- 白芝麻醬 1 大匙 https://beanpanda.com/13535
- 青紫蘇 5 片
◤春
水煮沸後,加入自製的紫蘇梅干,經刴泥處理。接著放入蘆筍進行輕微的燙煮,因為這種蘆筍熟得相當迅速,因此不需燙煮太久。隨後,加入裹有紅色火龍果粉的味噌丸,能夠使湯汁呈現粉紅色,色澤非常美觀。微酸且略鹹的口味激發食慾。我添加了庄内板麩皮,隨後便開始享用。如若對麩質過敏,則可省略此材料。
◤夏
鍋中加入適量的食用油,隨後將切成細丁的紅洋蔥炒香。當鍋內的油分乾掉時,適量加入熱水可減少油脂用量。將洋蔥翻炒約2至3分鐘,至其呈半透明狀態,接著加入玉米及玉米筍。隨後,倒入自製的番茄醬及熱開水,在水沸騰後,加入味噌丸並關火。此時,需緩慢攪拌,直至味噌丸完全溶解,最後再加入蒜粉。番茄與味噌這一意想不到的創新組合,展現出明亮而富有夏日氛圍的特質。
◤秋
製作味噌湯只需將味噌完全溶解,無需達到完全沸騰的狀態。請確保豆漿已完全煮熟。接著,加入南瓜丁,並煮約2至3分鐘,直至南瓜變軟。隨後,加入鴻喜菇及咖喱味噌丸。最後,灑上巴馬臣起司,以增添一絲濃郁的奶油風味。
◤冬
水沸腾后应加入山药片。山药的黏液可能引起皮肤瘙痒,因此在去皮切片时务必佩戴手套。在山药煮至软烂后,加入自制的白芝麻酱与紫苏叶,以及芝麻鹰嘴豆味噌丸。应缓慢搅拌至味噌丸完全溶解,然后再起锅。此道菜品味道浓郁甘醇,冬天饮用时确实令人感到温暖。此外,视频中所用的所有自制调味料均有相应的教程。
Miso is a fermented paste made from cooked soybeans, koji, and salt, and its fermentation process is divided into two stages. First, the rice koji mold needs to transform rice or barley into koji, which then produces powerful protein enzymes and starch enzymes that decompose the proteins and starches in the soybeans into amino acids and simple sugars. During the aging process, the participation of wild yeasts, lactic acid bacteria, and acetic acid bacteria adds layers to the flavor.
For babies with soy allergies, there is no need to worry, as we can use other ingredients to make miso. Today, we will use chickpeas to replace soybeans, creating a unique and rich miso with a shorter aging time than that of soybeans.
Even if you have never tried making fermented foods from the Fat Ding channel, I hope you gain a deeper understanding of this fascinating world of fermentation. If you enjoy this video, please subscribe, like, bookmark, and share to continue our delicious journey.
◤Chickpea Miso♦︎Ingrendients
- Chickpeas 600 g
- Brown rice koji or rice koji 200 g
- Coarse salt 40 g (add 20 g if white mold appears)
- Mineral water 360 ml (for making bean paste)
Before production, please be sure to check how to clean and disinfect.
◤Instructions
❶ Chickpeas should be thoroughly washed with clean water and then soaked in the refrigerator for 12 hours. After that, remove any bad or unsoaked beans, drain the water, and return the soaked beans to the bowl without soaking them again, placing them back in the refrigerator. For the next 2 to 3 days, rinse the chickpeas once a day. After each rinse, return them to a clean bowl. The sprouting process generally takes 1 to 4 days, depending on the temperature and the vitality of the beans. Once sprouted, chickpeas are not only easier to digest and absorb but also provide higher nutritional value.
❷ Before steaming the chickpeas, rinse them once more and line the steamer lid with a layer of soft cloth. Once the water boils, switch to medium heat and steam for 1 hour. To allow the steam to fill the pot effectively, poke some holes in the chickpeas. I will also place the enameled container used for fermentation into the steam oven for sterilization, steaming it at 100℃ for 1 hour. Either white rice koji or brown rice koji can be used to make miso; both types have detailed video tutorials available. Because chickpeas have a milder flavor than soybeans, I chose to use homemade brown rice koji. Before using, be sure to crush any clumps of koji.
❸ Time is up; check the state of the chickpeas. When the chickpeas can be easily crushed, it’s time to add the koji. If you find any beans that have turned brown, they should be removed.
❹ Place the steamed chickpeas in a large bowl, sprinkle them with coarse salt, then add the brown rice koji and mix well.
❺ Put the cooked chickpeas into a food processor, using a twist jar to handle thick substances. Although its capacity is small, it’s advisable to divide the chickpeas into 4 to 5 portions. Do not use high speed initially; you can use the pulse button to mix in short bursts until the chickpeas reach a coarse granule consistency. Gradually add clean water at a ratio of 60 ml of water for every 250 grams of beans; this way, the top layer of chickpeas won’t spin dry due to a lack of water.
❻ Mineral water or purified water can be used; however, be aware that the chlorine in tap water can inhibit fermentation. If using tap water, it must be boiled and left to cool at room temperature overnight before use the following day. The humidity level in the fermentation container is critical; if the chickpea paste is too dry, the mixture will not flow well, and the spaces between the bean residues may be too large, potentially promoting the growth of other bacteria, which can inhibit the activity of koji molds, affecting the overall biological or chemical reactions. Conversely, if the chickpea paste is too moist, microorganisms and enzymes may become overly active, leading to an uncontrolled microbial explosion. When the chickpeas become a smooth and delicate paste, they are ready to be packed.
❼ Take a palm-sized amount of chickpea paste and gently shape it into a ball. Like passing a ball, alternately pat the paste with both hands to remove air. Then, as if gently placing a precious treasure, lay it down lightly at the bottom of the storage container, ensuring that there’s no air between each ball of paste to maintain their close relationship. I particularly enjoy this step; it feels incredibly satisfying and de-stressing. Crumbled bits that fall onto the table should not be returned to the box.
❽ Once the chickpea paste is in the box, cover the surface with a layer of baking paper, pressing it gently so that it adheres closely to the surface of the miso, applying pressure from top to bottom. This is a key step to ensure everything tightens up, reducing air pockets and preventing other bacteria from invading and breeding inside. Use a glass cup or any heavy object that won’t mold as a weight on top, and remember to wipe the jar rim clean to avoid mold growth.
❾ Place it in the oven and let it ferment for 8 hours at a constant temperature of 60℃. If the amount of salt added is insufficient, white mold may form on the surface of the paste; there’s no need to worry. Simply scrape off the white mold, increase the salt proportion, and return it to the oven for 24 hours of fermentation at 60℃.
❿ If you don’t have high expectations, chickpea miso fermented for 36 hours can also be tasted; however, for fermentation enthusiasts like me, the flavor of lightly fermented miso can be insufficient. Therefore, I will let this batch of miso sit in the refrigerator for a slow fermentation process of an entire year, in anticipation of achieving deeper flavors.
◤15 months later, open it
⓫ Compared to the uniquely flavored yellow soybean miso, the miso made from chickpeas exudes a fresher charm. Its texture is relatively soft, with a moderate mouthfeel, and the salt content is just right, ensuring it does not taste overly salty or greasy, making it an excellent alternative for those with soy and gluten allergies.
⓬ I enjoy a bowl of this miso in the morning or after a busy day, but the process of making it at home can be a bit cumbersome. Especially with homemade fermented miso, the tools used must undergo thorough disinfection to ensure they are free of water and oil, and they require cleaning after extraction.
⓭ Molding the miso into bite-sized balls for soup is a convenient method for measuring and usage. There is a seafood soup package that includes dried kombu, dried shrimp, dried scallions, fish powder, and crab powder flavor enhancers. If you are as particular about quality as I am, you can also make your own umami powder by mixing broth powder with miso ingredients, rolling them into balls by hand, which makes it very convenient for soup preparation.

◤Basic Miso Ball (Serves 10 @ 20g)
- Miso 180 g
- Homemade Dashi Powder 12 g https://beanpanda.com/21688
- Dried Kombu 8 g
- Dried Green Onion 1 g
◤Basic Miso Soup (1 serving)
- Basic Miso Ball 1 piece
- Hot Water 200 g
- Chickpea Tofu or your preferred ingredient
◤Basic Miso Ball ♦︎ Instructions
❶ Combine miso and homemade umami powder with dried seaweed in a mixing bowl; for those using purely plant-based ingredients, shiitake powder and kombu powder can be chosen. Using a variety of ingredients can enhance the umami effect, then add dried green onion flakes. Stir carefully with a spatula to avoid clumping, then divide into ten portions and roll into balls, each weighing about 20 g.
❷ Miso balls can also be coated with toppings such as white sesame, natural vegetable powders, or curry powder; gently rolling will allow the ingredients to adhere to the surface of the miso, adding a premium feel while seasoning. You can also add various dried vegetables.
❸ Place the finished product in an enamel box and remove the air to prevent mingling of flavors. Since miso itself is relatively soft and difficult to shape, adding umami powder can absorb excess moisture, making the texture of the miso firmer.
❹ The umami powder also acts as a seasoning, similar to adding broth, further enhancing the umami flavor. Store it in the refrigerator for convenient use at any time.

◤Chickpea miso soup
Bring hot water to a boil and then turn off the heat, adding the miso balls. The amount of hot water can be adjusted according to personal preference, and stir until fully dissolved. This product is my homemade chickpea tofu, and I will share the detailed recipe next time, so stay tuned. This miso soup is convenient and delicious, and with small variations in different seasonings, it can add an interesting twist to life. The chickpea tofu has a smooth texture after cooking in the soup, making it quite delightful.
◤Miso Soup for Spring Seasons♦︎Ingredients
(Spring, Summer, Autumn, Winter Miso Ball without Kombu)
- Basic Miso Ball 1 piece
- Red Dragon Fruit Powder to wrap the miso ball https://beanpanda.com/51316
- Hot Water 200 ml
- Kombu Strips a small pinch
- Shiso Umeboshi (pitted and chopped) 1 piece
- BB Asparagus 10-15 stalks
- Shonai Board Gluten (can be omitted for gluten allergies)
◤Miso Soup for Summer Seasons♦︎Ingredients
- Miso ball 1 piece
- Hot water 200 ml
- Sautéed red onion diced 20 g
- Corn kernels 2 tablespoons
- Corn cobs diced 4 pieces
- Homemade tomato sauce 1 tablespoon https://beanpanda.com/88245
- Homemade garlic powder 1/4 teaspoon https://beanpanda.com/16769
- Dried onion flakes for garnish
◤Miso Soup for Autumn Seasons♦︎Ingredients
- Basic Miso Ball 1 piece
- Curry powder just wrap the miso ball with it
- Unsweetened soy milk 200 ml
- Pumpkin (cut into 5 mm cubes) 80 g
- Enoki mushrooms 10 pieces
- Parmesan cheese to taste for garnish
◤Miso Soup for Winter Seasons♦︎Ingredients
- Basic Miso Ball 1 piece
- White sesame Roll to wrap around the miso ball
- Hot water 200 ml
- Yam 30 g, sliced
- White sesame paste 1 tablespoon https://beanpanda.com/13535
- Shiso leaves 5 pieces
◤Spring
After boiling the water, add homemade purple perilla plum paste, which has been processed into a paste. Next, lightly blanch the asparagus, as this type of asparagus cooks quite rapidly, so it doesn’t need to be boiled for too long. Subsequently, add miso balls coated with red dragon fruit powder, which will turn the soup pink, creating a very beautiful appearance. The mildly sour and slightly salty flavor stimulates the appetite. I added Shonai-style wheat gluten, and then I began to enjoy it. If you are allergic to gluten, you can omit this ingredient.
◤Summer
Add an appropriate amount of cooking oil to the pot, and then sauté the diced red onion until fragrant. When the oil in the pot has mostly evaporated, adding hot water can reduce the amount of grease used. Stir-fry the onion for about 2 to 3 minutes until it becomes semi-transparent, then add the corn and baby corn. Next, pour in the homemade tomato sauce and hot water, and once the water reaches a boil, add the miso balls and turn off the heat. At this point, gently stir until the miso balls fully dissolve, and finally add garlic powder. This unexpected combination of tomato and miso showcases bright characteristics that evoke a summery vibe.
◤Fall
To make miso soup, simply dissolve the miso completely without needing to bring it to a full boil. Ensure that the soy milk is fully cooked. Then, add diced pumpkin and cook for about 2 to 3 minutes until the pumpkin becomes soft. After that, add hon-shimeji mushrooms and curry miso balls. Finally, sprinkle Parmesan cheese on top to add a rich creamy flavor.
◤Winter
After the water boils, add the yam slices. The mucilage of yam may cause skin itching, so it’s essential to wear gloves while peeling and slicing. Once the yam is cooked until soft, add homemade sesame paste and perilla leaves, along with sesame chickpea miso balls. Stir slowly until the miso balls completely dissolve, and then remove from heat. This dish has a rich and mellow flavor, making it truly warming to enjoy in winter. Additionally, all homemade seasonings used in the video come with corresponding tutorials.


