自製素食烤麩【零失敗沒怪味超下飯】洗麵筋 VS 不洗麵筋 可蒸可炸一次教你

你的訂閱是給我最好的鼓勵
我在上一部影片裡分享了涼皮的小技巧。製作涼皮後所剩下的麵筋也不用浪費,可以用來做烤麩。 我用兩種方法製作烤麩:洗麵筋和不洗麵筋。然後再比較一下他們的口感有甚麼分別。最後還有一道糖醋麵筋的做法

我覺得比超巿買回來的口感更好,不洗麵筋的烤麩做法,巿面上有一種麵筋粉,也叫谷脘粉。麵筋粉是從小麥麵粉中,提取出來的植物蛋白質,它的味道不是很好聞,我通常會加入營養酵母,它是素食食物之一,帶有堅果和起司的香味,味道溫和又美味

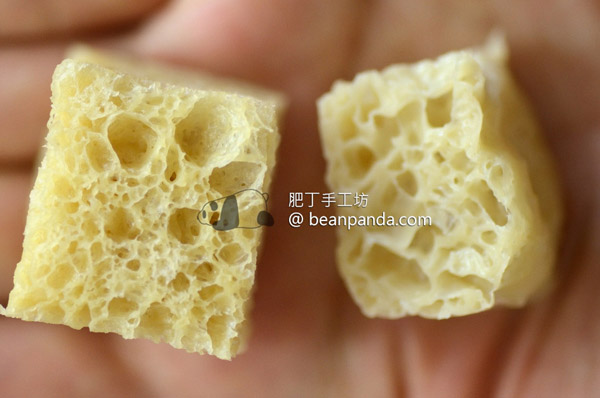
兩種方法做出來的烤麩,口感有很大的不同,你可以根據自己的口感偏好,來選擇要用哪種做法,左邊是麵筋粉做的烤麩,右邊是中筋麵粉洗出來的。我比較喜歡洗麵筋的做法,口感比較水潤嫩滑,麵筋粉做的韌性較好,口感比較粗獷有勁

說到烤麩的料理,很多人都知道經典的冷盤小菜,四喜烤麩,這次換換口味,試試甜酸味道的糖醋麵筋。
烤麩是素食者的好朋友,而且可以用來做很多不同的料理。糖醋麵筋加入青椒、紅椒、洋蔥等蔬菜,做成色彩繽紛的糖醋麵筋燴菜,非常美味
除了糖醋麵筋,烤麩還可以用來做烤麩卷、烤麩餅、烤麩串等等,非常多樣化。此外,烤麩還可以用來代替肉類,做出素食版的炒肉絲、炸雞塊等料理。
感謝發現烤麩的人,讓我們更了解素食料理的多樣性。

【洗麵筋♦烤麩】(製作約 110 g 烤麩)
- 中筋麵粉 All Purpose Flour 250 g
- 速發酵母 Instant Yeast 1小匙
- 白砂糖 Sugar 1/2 小匙
- 37C 溫水 Lukewarm Water 1 大匙
【不洗麵筋♦烤麩】(製作約 110 g 烤麩)
【材料】
- 麵筋粉 Vital Wheat Gluten 200 g
- 中筋麵粉 All Purpose Flour 16 g
【酵母水】
- 速發酵母 Instant Yeast 1又1/2小匙
- 白砂糖 Granulated Sugar 1/2 小匙
- 營養酵母 Nutritional Yeast 1/4 杯
- 清水 Water 250 ml
【這裡買】
麵筋粉/谷脘粉 https://iherb.co/s3rRgmFh


【糖醋麵筋】
- 烤麩/麵筋肉 Roasted Wheat Gluten or Wheat Gluten 200 g
- 三色甜椒 Sweet Bell Pepper
- 鳳梨 Pineapple
【糖醋醬汁】
- 番茄醬 Homemade Tomato Paste 2 大匙
- 原蔗糖 Demerara Raw Cane Sugar 1 大匙
- 羅漢果糖 Montfruit Sweetener 2 大匙
- 有機蘋果醋 Organic Apple Cider 3 大匙
- 釀造醬油 Homemade Soy Sauce 2 大匙
- 伍斯特醬 Worcestershire Sauce 1/4 小匙
- 清水 Water 5 大匙
【澱粉水】
- 玉米澱粉 Corn Starch 1 小匙
- 清水 Water 1 大匙

【洗麵筋♦氣炸油麵筋的做法】
1. 用洗麵筋的方法,先將麵糰的澱粉質和蛋白質分開。大碗裡加入中筋麵粉及鹽,攪拌均勻,再倒入開水攪拌。不同廠牌的麵粉吸水度不一樣,不要一次倒入所有的溫水,留下約1/10的水,待麵粉吸收水份,再感受麵糰的濕度,然後再補充水份
2. 揉成一個表面粗糙的麵糰,加蓋 靜置 45 分鐘,防止麵糰表面變乾
3. 麵粉裡的澱粉溶於水,但蛋白質不溶於水,麵粉和水混合揉成麵糰後,麵糰內部的成份,便會開始互相排擠,只要時間夠長,便形成了麵筋網絡,靜置後稍加以適量的搓揉,便可以揉出不黏手,表面光滑的麵糰,再揉一下加強麵筋的強度

4. 把麵糰滾圓放在大盤裡,加蓋再靜置 15 分鐘,經過鬆弛的麵糰,彈性更好。可以拉出薄膜,這樣做出來的烤麩會更好吃,滾圓放在大盤裡,開始洗麵糰囉~
5. 把麵糰放在水裡擠壓沖洗,清水會慢慢變得混濁,雙手擠壓。當水變成豆漿般濃郁的奶白色,撐開麵筋,增加接觸水份的面積。用網篩過濾,收集洗過麵筋的澱粉水,再加入新的水,少量多次,這過程大概重複 15 ~20 次,直到澱粉水變得很稀淡,麵糰變成坑坑漥漥的濕麵筋,就可以停止了

6. 澱粉水收集起來,就是做涼皮的食材,做法可以參考涼皮的影片
7. 以蛋白質為主的麵筋,會自然的黏在一起,用手撕開擠出小球,將收口向下拉揑緊實,然後放進氣炸鍋裡,輕輕噴上一層薄油

8. 按鍵開動,氣炸時麵筋會膨脹變大,麵糰之間要保持適當的距離。200°C總共烤10 分鐘,期間需要 1 到 2 次取出翻面
9. 第 1 次炸好的麵筋會下塌,但不用擔心,再經過 5 分鐘的氣炸後,會膨回來,翻面讓氣炸更加均勻
10. 第 2 次翻面,麵筋越來越輕,在氣炸鍋的氣流下旋轉,最後兩分鐘,油麵筋變得金黃膨脹定型,健康版的油麵筋就做好了。膨脹得鼓鼓的很酥脆,可以室溫存放
【洗麵筋♦蒸麵筋的做法】
1. 如果不想油炸,可以多走一步。速發酵母和一點水攪拌溶化,加入麵筋和白砂糖,輕輕揉合至麵筋吸收糖和酵母,把麵糰沒吸收的水倒掉,在容器上噴一層薄油
2. 放下麵筋,蓋上濕布巾,放在溫暖的地方發酵,我把麵糰放進蒸烤爐裡面,保持恒定的溫度,這樣比較容易掌握發酵的時間
35°C大約需要 2 小時,如果在低於室溫 20°C 的環境,可能需要 4~5 個小時
3. 你會看到麵筋裡面充滿了氣孔,水沸騰後上鍋,加蓋調至中火蒸 20 分鐘,時間依據麵筋的厚度調整。看看底部的麵筋組織,它跟麵包不同的地方,就是少了澱粉。蒸好的麵筋好鬆軟很有彈性
4. 切丁

【不洗麵筋♦氣炸油麵筋的做法】
1. 速發酵母,加入 37°C 溫水,攪拌至酵母完全溶化,靜置10分鐘
2. 酵母液體積膨脹,液體裡充滿了氣泡
3. 麵筋粉混合營養酵母、中筋麵粉。麵筋粉有很強的吸水性和粘彈性,我加了一些中筋麵粉緩和一下

4. 乾粉混合後加入酵母液,慢慢加入溫水,因為麵筋粉的黏度比較大,也很吸水,所以攪拌很快就會變得困難,記得注意麵糰的濕度,麵筋粉吸收水份後,要稍等一會讓它吸收,如果發現水加太多了,可以把麵糰沒吸收的水倒掉。搓揉成糰,完成的麵糰不會黏手,加上蓋子讓它發酵
5. 今天的室溫 25°C,大概需要 30分 鐘左右,當麵糰表面出現很多氣孔,按下去柔軟有彈性,就可以搓揉幾下,滾圓
6. 我把麵糰分成兩份,一份氣炸 一份上鍋蒸,放在不同的容器中,蓋上濕布,放在 35°C 的環境中發酵,直到體積變成原來的3倍,用了大約 2 個小時,用剪刀剪開,擠出小圓球,把週圍收口向下拉揑緊實,蓋上濕布靜置 20 分鐘,小麵筋膨脹2倍

7. 噴上一些油,放進氣炸鍋裡,200°C 烤 10分鐘
8. 5 分鐘後取出翻面,用麵筋粉做的麵糰較硬,翻面時沒有下塌很多,再烤 5 分鐘至金黃,膨脹得鼓鼓的,外皮很脆

9. 放在廚房紙巾上吸收多餘的油,撕開看一下裡面的組織,小心地撕開,因為它們很燙
10. 另外一份麵筋,上鍋蒸 20 分鐘
11. 定型後脫模,發酵所產生的氣孔,就如網狀的海綿,好像切麵包的感覺


【糖醋烤麩】
1. 首先預備澱粉水和醬汁。混合自製番茄醬、原蔗糖、羅漢果糖、有機蘋果醋、釀造醬油、伍斯特醬及清水,攪拌均勻後備用
2. 在另一個碗裡,以清水溶化玉米澱粉,攪拌至澱粉溶化
3. 三色甜椒,先把蒂部除掉,然後切塊,鳳梨切塊
4. 鍋裡加入一點油,甜椒下鍋翻炒一下,加入鳳梨,盛起蔬菜
5. 加熱糖醋醬汁,醬汁開始沸騰後加入澱粉水,攪拌均勻,加入油麵筋,自己做的乾淨不油膩,所以不用汆燙,可以直接放進糖醋醬汁裡悶煮,再加入一點水,以防止等一下悶煮時乾掉,麵筋粉做的悶煮時間要長一些,大概10分鐘,洗麵筋的烤麩悶5分鐘就可以了
6. 盛盤,吸飽甜酸醬汁的麵筋,吃來口感有勁,顏色也十分好看
In my previous video, I shared a little trick for making Liangpi (a type of cold noodle). Don’t waste the leftover gluten from making Liangpi – you can use it to make baked gluten! I made two versions of baked gluten: one where I washed the gluten and another where I didn’t. Then, I compared their textures. Finally, I also shared a recipe for sweet and sour gluten.
I think the homemade roasted gluten without washing has a better texture than the store-bought one. There is a type of flour called wheat gluten flour or vital wheat gluten available in the market. It is a plant-based protein extracted from wheat flour and has a not-so-pleasant smell. I usually add nutritional yeast, a type of vegetarian food with a nutty and cheesy flavor, to enhance the taste.
The two methods of making roasted gluten result in significantly different textures. You can choose the method according to your preference. The one on the left is made with wheat gluten flour, while the one on the right is made by washing high-gluten flour. I prefer the latter as it has a more tender and smooth texture, while the former has a chewier and firmer texture.
When it comes to dishes made with roasted gluten, many people know the classic cold appetizer, “Four Delicacies Roasted Gluten.” This time, let’s try a sweet and sour flavor with sugar and vinegar roasted gluten. Adding vegetables such as bell peppers, red peppers, and onions can make a colorful and delicious sugar and vinegar roasted gluten stew.
In addition to sugar and vinegar roasted gluten, roasted gluten can be used to make roasted gluten rolls, roasted gluten cakes, roasted gluten skewers, and more. Moreover, roasted gluten can also be used to replace meat and make vegetarian versions of dishes such as stir-fried shredded meat and fried chicken nuggets.
Thanks to those who discovered roasted gluten, we can better understand the diversity of vegetarian cuisine.
【Washing Method】
- All Purpose Flour 250 g
- Instant Yeast 1 tsp
- Sugar 1/2 tsp
- 37C Lukewarm Water 1 tbsp
【Non Washing Method】
◤Ingredients
- Vital Wheat Gluten 200 g
- All Purpose Flour 16 g
◤Yeast Liquid
- Instant Yeast 1 & 1/2 tsp
- Granulated Sugar 1/2 tsp
- Nutritional Yeast 1/4 cup
- Water 250 ml
◤Sweet and Sour Gluten
- Roasted Wheat Gluten or Wheat Gluten 200 g
- Sweet Bell Pepper
- Pineapple
◤Sweet and Sour Sauce
- Homemade Tomato Paste 2 tbsp
- Demerara Raw Cane Sugar 1 tbsp
- Montfruit Sweetener 2 tbsp
- Organic Apple Cider 3 tbsp
- Homemade Soy Sauce 2 tbsp
- Worcestershire Sauce 1/4 tsp
- Water 5 tbsp
◤Starch Liquid
- Corn Starch 1 tsp
- Water 1 tbsp
◤Shop Here
Vital Wheat Gluten https://iherb.co/s3rRgmFh
Nutritional Yeast https://iherb.co/YACtMSY
Use promo code PAN8577 to enjoy discounts on iHerb https://iherb.co/7Yjri1h
◤Instruction for Washed Gluten and Air-Fried Gluten
1. Separate the starch and protein of the dough by washing the gluten. In a large bowl, mix together all-purpose flour and salt, then pour in hot water while stirring. Different brands of flour have different water absorption rates, so don’t pour in all the water at once. Reserve about 1/10 of the water and wait for the flour to absorb it before adding more.
2. Knead the dough until it becomes rough and then cover it and let it rest for 45 minutes to prevent the surface from drying out.
3. When flour is mixed with water, the starch dissolves but the protein does not. As the dough is kneaded, the ingredients inside the dough start to repel each other. Given enough time, gluten networks will form. After resting, knead the dough again to strengthen the gluten.
4. Roll the dough into a ball, place it in a large dish, and cover it before letting it rest for 15 minutes. The gluten will have better elasticity after this relaxation period. You should be able to stretch it into a thin film, which will make the gluten more delicious.
5. Put the dough in water and press and wash it. The water will gradually become cloudy, and you should squeeze it with your hands. Keep squeezing until the water becomes a milky white color, and the gluten is fully covered in water.
6. Collect the starchy water and use it to make cold skin. Refer to a video tutorial to learn how to make cold skin.
7. The gluten, which is mainly composed of protein, will naturally stick together. Tear the gluten and squeeze it into small balls, pull the opening downward and tighten it, then put it into the air fryer and lightly spray it with oil.
8. Press the button to start the air fryer. The gluten will expand during the frying process, so make sure to maintain a proper distance between the pieces. Bake at 200°C for a total of 10 minutes, flipping once or twice during the process.
9. The first batch of fried gluten may deflate, but don’t worry. After 5 more minutes of air frying, it will puff back up again. Flip it over to ensure even frying.
10. As the frying continues, the gluten will become increasingly light and spin in the air fryer’s airflow. In the final two minutes, the oil gluten will turn golden and become crispy. The healthy version of the oil gluten is now ready. It can be stored at room temperature and will be crispy and delicious.
◤Instruction for Unwashed Gluten and Air-Fried Gluten
1. Mix instant yeast with 37°C warm water and stir until the yeast is completely dissolved. Let it sit for 10 minutes.
2. The yeast mixture will expand in volume and be filled with bubbles.
3. Mix the gluten flour with nutritional yeast and all-purpose flour. Gluten flour has strong water absorption and elasticity, so I added some all-purpose flour to moderate it.
4. Mix the dry ingredients with the yeast mixture and slowly add warm water. Since gluten flour has a high viscosity and absorbs water quickly, stirring will become difficult. Pay attention to the dough’s moisture level and let it absorb the water for a while. If you find that too much water has been added, you can pour off the excess. Knead the dough until it is not sticky, cover it, and let it rise.
5. At room temperature of 25°C, it will take about 30 minutes for the dough to rise. When there are many air holes on the surface and it is soft and elastic when pressed, knead it a few times and roll it into a ball.
6. I divided the dough into two parts, one for air frying and the other for steaming. I put them in different containers, covered them with a damp cloth, and let them rise in a 35°C environment until their volume tripled, which took about 2 hours. I cut them with scissors, squeezed out small balls, and pulled the edges tightly downwards. Cover them with a damp cloth and let them sit for 20 minutes until they double in size.
7. Spray some oil on the air fryer and put the gluten in it. Bake it at 200°C for 10 minutes.
8. Flip it over after 5 minutes. The dough made with gluten flour is harder, so it won’t collapse when flipped over. Bake for another 5 minutes until golden and puffy with a crispy outer layer.
9. Place it on a kitchen paper towel to absorb excess oil. Carefully tear it open to see the texture inside because it will be hot.
10. Steam the other half of the gluten for 20 minutes.
11. After shaping and removing it from the mold, the air holes produced by fermentation are like a mesh sponge, like cutting bread.
◤Instrutction for Sweet and Sour Grilled Gluten
1. First, prepare the starch water and sauce. Mix homemade tomato sauce, raw cane sugar, monk fruit sugar, organic apple cider vinegar, soy sauce, Worcestershire sauce, and water together and stir well. Set aside.
2. In another bowl, dissolve cornstarch in water and stir until the starch is dissolved.
3. Remove the stems from the tri-color bell peppers and cut them into pieces. Cut the pineapple into chunks.
4. Add a little oil to the pan, stir-fry the bell peppers, add the pineapple, and remove the vegetables.
5. Heat the sweet and sour sauce until it boils, add the starch water and stir well. Add the grilled gluten, which is clean and not greasy because it was homemade, so there’s no need to blanch it. You can directly simmer it in the sweet and sour sauce. Add a little more water to prevent it from drying out while simmering. The simmering time for gluten made from gluten flour should be longer, about 10 minutes, while the simmering time for washed gluten should be 5 minutes.
6. Plate the grilled gluten, soaked in the sweet and sour sauce. It has a chewy texture and a beautiful color.


