耗時 84 小時 ❇️ 把糙米變成萬用魔法調味料 【麴菌系列 003】How to Make Brown Rice Koji
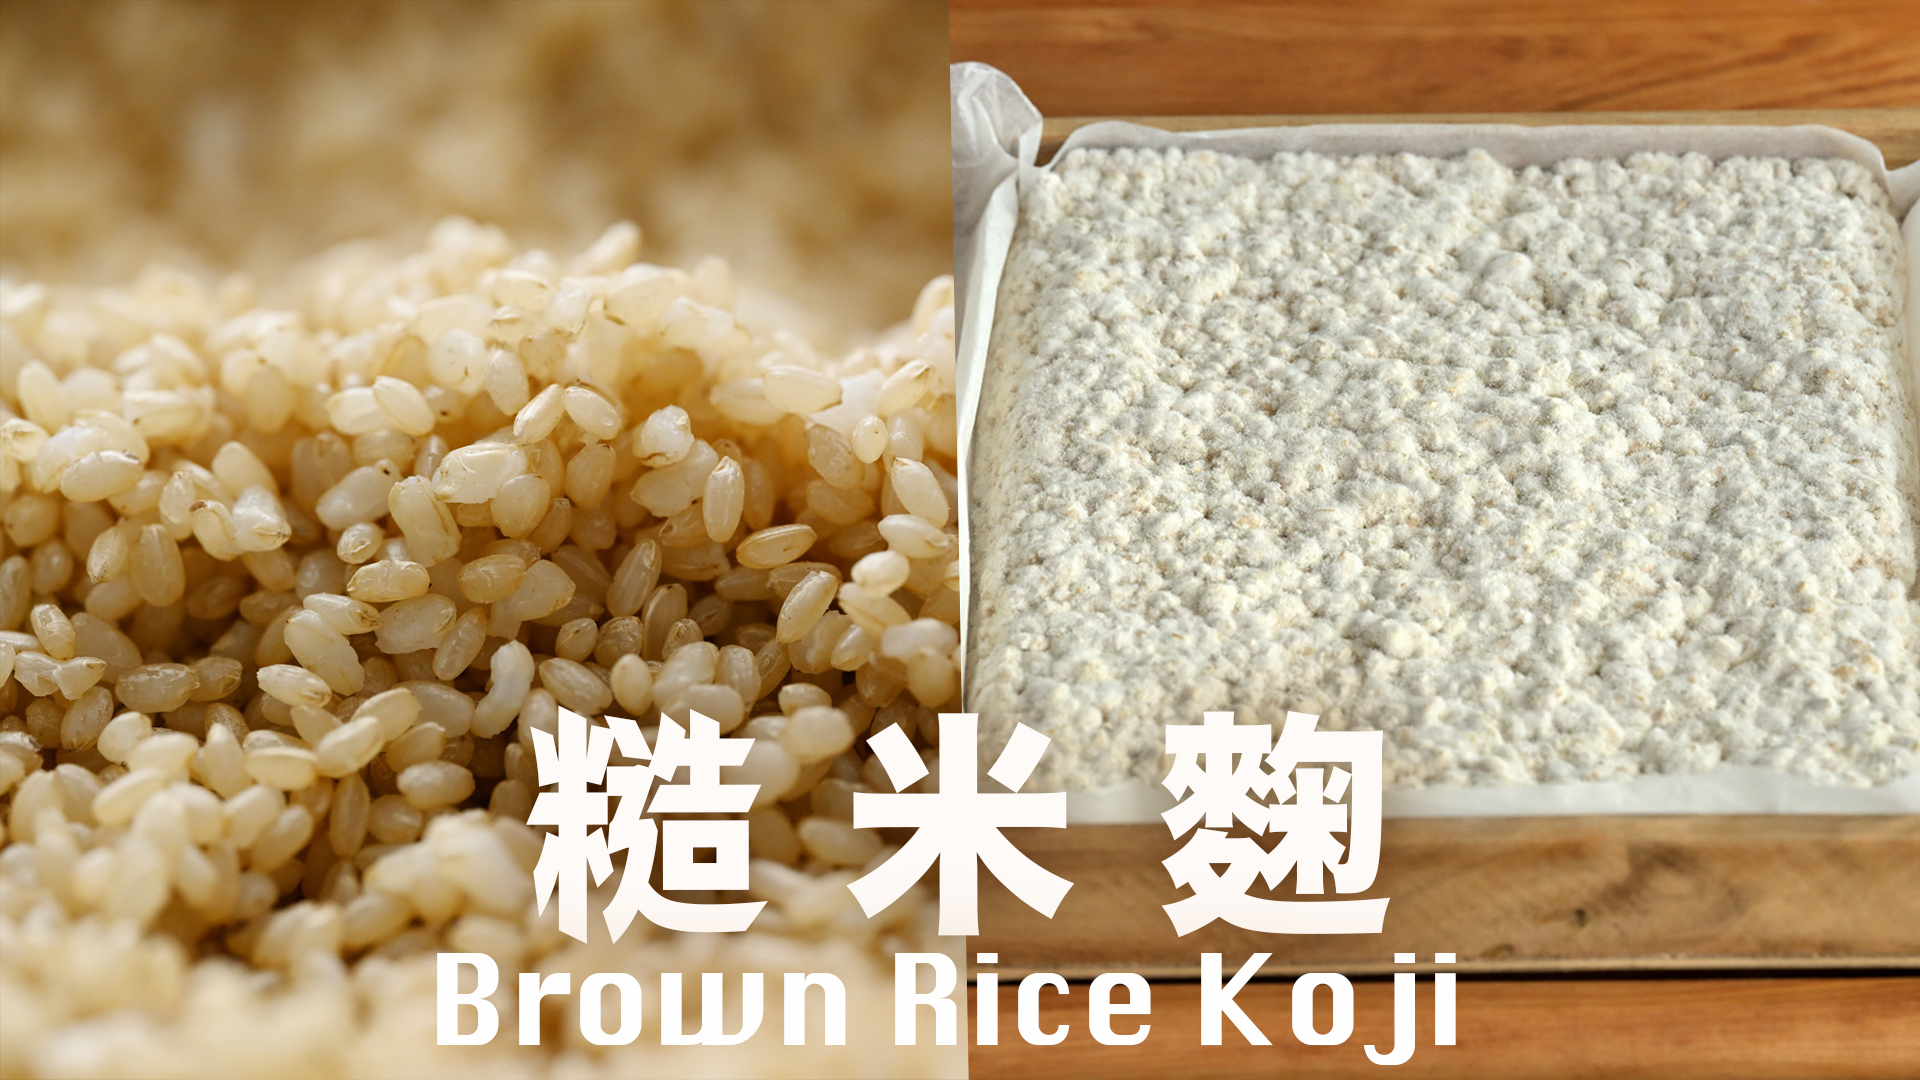
米麴是接種了米麴菌的米或大麥,最常見的米麴是用白米培養的,今天我們來培養外面很少賣的糙米麴
◤材料 (可製作約 800 g的米麴餅)
- 有機短糙米 Organic Brown Rice 600 g
- 磨碎米麴 Koji 5 小匙 tsp (我用伊勢惣宮古米麴)
- 礦泉水 Mineral Water
◤工具
- 蒸烤爐、烤箱或乳酪機 Any kind machine that could keep constant temperature
- 木盤或竹網篩
- 烘焙紙 Baking Paper
- 網篩 Sieve
- 探針式電子溫度計 Cooking Thermometer
伊勢惣宮古米麴 IseSo Miyako Koji
◤做法
❶ 用飲用水或礦泉水將糙米浸泡,並輕輕攪拌以防止黏結,確保每一粒都能接觸到水。
❷ 蓋上碗浸泡 4 小時,或選擇放入冰箱冷藏 10 小時。接著,將浸泡後的水用網篩過濾掉,並將鍋內的水煮至沸騰。
❸ 在蒸鍋內鋪上棉布,然後將瀝乾的糙米倒入鍋中,並在米中間戳一個洞,以促進蒸氣的循環,使用大火隔水蒸至 40 至 50 分鐘。特別需要注意的是,若使用電鍋煮熟,可能會導致殼物含水過多,從而使糙米變得軟爛,無法維持麴孢子的生存,並給翻麴降溫帶來不便。因此,採用蒸的方式可使糙米熟透,顆顆分明且飽滿,當用湯匙壓下去時會有黏性,吃起來中心不硬則表示已熟。
❹ 用白醋對木托盤進行消毒,將白醋倒入並用酒精紙巾擦拭一遍,然後晾乾。將蒸好的糙米平攤在烘焙紙上,趁熱翻動,加速降溫至35℃攝氏度,以防止剩餘澱粉粘結。輕輕翻動時,避免用力過猛,以免壓破。米麴菌具有較強的生命力,只要環境適宜,通常兩天即可培養成功。
❺ 使用購買的米麴作為培養麴的孢子菌種,我選擇伊勢惣宮古米麴,並將其磨成粉,均勻撒在熟糙米的表面,然後用刮刀輕輕混合,確保每一角落均勻混合。最後,再撒上剩餘的麴種並再次翻動,這樣即完成種菌的步驟。接種好的糙米應均勻分散,輕輕搖晃以保證厚度均勻,避免過厚導致內部透氣不良。用微濕的布巾將其蓋好,記得每個地方都要被覆蓋到,接著將其置於烤箱中層,底下放置金屬托盤以保持透氣。前 24 時麴的溫度需控制在 35 至 42 ℃之間,當烤箱達到此溫度後即可關閉。
❻ 在夏季,每 3 至 4 小時啟動一次烤箱,以使其運行 30 分鐘,維持烤箱內的溫度。經過 10 小時之後,新手建議不使用發芽糙米,因為完整的糠層會使菌絲不易穿透。
第 16 小時
❼ 不時噴水以保持糙米濕度,否則糙米將乾燥,菌絲無法穿透澱粉生長
第 24 小時
❽ 表面將開始出現黴菌。從發酵箱取出後,應將糙米放置於消毒過的桌面上,糙米表面將會長出纖細的白色絲線,稍微使糙米粘結在一起。此時,麴菌的代謝力量會有所降低,需將糙米翻動散開,以斷裂菌絲,使底部的麴菌能夠接觸空氣,準備再次伸展其網絡,加速生長。翻動糙米不僅可增加麴的表面接觸空氣的機會,同時也有助於散熱,以避免麴過熱而死亡。為了探測溫度,這是培麴成功的關鍵,應將溫度計插入殼物中間,再放回烤箱。麴的溫度會迅速上升,烤箱門無需完全關閉,應每幾小時打開一次烤箱門。
第 48 小時
❾ 麴的菌絲與糙米緊密黏合,麴的表面還會覆蓋著白色絨毛,糙米麴需 44 至 48 小時方可完全熟成,屆時將展現完整的風味和酵素。將托盤放入冰箱冷藏十二小時,冷藏後可抑制麴的生長,但酵素仍將持續活動,使麴變得更甜。每個人的嗅覺皆有所不同,我認為成熟的糙米麴散發著熟栗子的香氣,也有人感受到杏桃的芬芳。
❿ 經過 48 小時的發酵後,菌絲變得強壯,結塊後應儘量避免弄碎,切成每次使用的方塊,以降低被污染的機會。在收割麴的同時,應停止其生長,若不立即使用,則需真空密封以存放於冷凍庫。
第 84 小時
⓫ 我會定期養麴,將經過 48 小時的麴延長發酵,以便收成孢子。將結塊掰開、撒散但不要壓碎糙米麴,以創造最大的表面積,然後再次蓋上微濕的布巾送回烤箱,讓麴再生長 36 小時,持續監測溫度與濕度,但無需翻動糙米。延長發酵 36小時(總發酵共 84 小時)後,便得到了毛茸茸的白色糙米麴,麴的香味比之前更為濃郁,愈加接近肉類的芬芳。只需進行一次投資,便可製作出屬於自己的麴種,並不斷培養更多的米麴。
⓬ 當您觸摸時,手指將沾上粉末,當掰開時會散發出塵狀的胞子。接下來,將其切割成塊,於 45 ℃ 下乾燥十小時,作為麴種的糙米麴必須進行乾燥,以避免受到其他微生物的感染。烘焙紙無需移除,可直接放入夾鏈袋,最佳選擇為冷凍保存。若木托盤未經消毒,麴容易被其他微生物感染,長出灰色或其他顏色的胞子則不可食用。
⓭ 糙米麴的用法與白米麴相似,但其香味相對更為濃郁。將其搓散後放入消毒過的玻璃瓶,加入海鹽及礦泉水,再加上熟成的鹽麴來加快發酵,並每日攪拌,待其變成粥的質感後,即可用於醃製肉類與蔬菜。此法可引出食材中的甜味與鮮味,並可用於製作鷹嘴豆味噌,消除豆腥味,其味道並不劣於傳統的黃豆味噌。詳細的做法可參考這裡:
鷹嘴豆味噌 https://beanpanda.com/156242

Rice koji is rice or barley that has been inoculated with koji mold. The most common koji is cultivated using white rice. Today, we will cultivate brown rice koji, which is rarely sold in stores.
Ingredients (for making about 800 g of rice koji cake)
- Organic Brown Rice 600 g
- Koji 5 tsp (I used Ise Sōgū Mikoji)
- Mineral Water
Equipment
- Any kind machine that could keep constant temperature
- Wooden board or bamboo sieve
- Baking Paper
- Sieve
- Cooking Thermometer
Koji rice on Amazon
Instructions
❶ Soak brown rice in drinking water or mineral water, and gently stir to prevent it from sticking together, ensuring that each grain comes into contact with water.
❷ Cover the bowl and soak for 4 hours, or opt to refrigerate it for 10 hours. Then, filter out the soaked water using a sieve and bring the water in a pot to a boil.
❸ Line a steamer with cotton cloth, then pour the drained brown rice into the pot, creating a hole in the middle of the rice to facilitate steam circulation. Use high heat to steam for 40 to 50 minutes. It is particularly important to note that using a rice cooker may result in excess moisture in the husk, causing the brown rice to become mushy and unable to maintain the survival of the koji spores, complicating the cooling of the koji. Therefore, using steaming keeps the brown rice thoroughly cooked, with distinct and plump grains that cling together when pressed by a spoon, and indicates that it is properly cooked if the center is not hard.
❹ Disinfect the wooden tray with white vinegar by pouring it in and wiping it with an alcohol wipe, then let it dry. Spread the steamed brown rice on baking paper and gently toss it while it is hot to accelerate cooling to 35°C, preventing remaining starch from sticking together. When tossing, be gentle to avoid crushing the grains. Koji mold has strong vitality; if the environment is suitable, it usually takes two days to cultivate successfully.
❺ Use purchased koji rice as the spore culture; I chose Ise Sojinko koji and ground it into powder, evenly sprinkling it on the surface of the cooked brown rice, then gently mix with a spatula to ensure even distribution in every corner. Finally, sprinkle the remaining koji spores and mix again, completing the inoculation step. The inoculated brown rice should be evenly spread, gently shaken to ensure even thickness, avoiding excessive thickness that can lead to poor air circulation. Cover it with a slightly damp cloth, ensuring every part is covered, then place it in the middle of the oven with a metal tray underneath for ventilation. For the first 24 hours, the temperature of the koji should be maintained between 35 and 42°C; once the oven reaches this temperature, it can be turned off.
❻ In summer, turn on the oven every 3 to 4 hours for 30 minutes to maintain the internal temperature. After 10 hours, it is advised for beginners not to use sprouted brown rice, as the intact bran layer will make it difficult for the hyphae to penetrate.
16 Hours Later
❼ Occasionally spray water to maintain the moisture of the brown rice, or else the rice will dry out, and the hyphae will be unable to penetrate and grow.
24 Hours Later
❽ The surface will begin to show mold. After removing the rice from the fermentation box, it should be placed on a disinfected tabletop, where fine white threads will grow on the surface of the brown rice, slightly causing the rice to stick together. At this time, the metabolic power of the koji mold will be reduced; the brown rice must be stirred to break up the hyphae, allowing the koji at the bottom to access air and prepare to extend its network for accelerated growth. Stirring the brown rice not only increases the opportunity for the koji’s surface to contact the air but also helps dissipate heat to prevent overheating and death of the koji. To monitor temperature, this is crucial for successful koji cultivation; insert a thermometer into the middle of the rice, then return it to the oven. The temperature of the koji will rise rapidly; the oven door does not need to be fully closed and should be opened every few hours.
48 Hours Later
❾ The hyphae of the koji will be tightly bonded with the brown rice, and the surface will be covered with white fluff. The brown rice koji requires 44 to 48 hours to fully mature, at which point it will exhibit complete flavor and enzymes. Place the tray in the refrigerator for 12 hours; chilling can suppress the growth of the koji, but the enzymes will continue to be active, making the koji sweeter. Each person’s sense of smell differs; I believe that mature brown rice koji emits a fragrant aroma of roasted chestnuts, while others may detect the scent of apricots.
❿ After 48 hours of fermentation, the hyphae become strong. When breaking it up, efforts should be made to avoid crushing, cutting it into pieces for each use to reduce the chance of contamination. During the harvesting of the koji, growth should be halted; if not used immediately, it should be vacuum-sealed and stored in the freezer.
84 Hours Later
⓫ I regularly cultivate the koji, extending the fermentation of the koji after 48 hours to harvest spores. Break up the clumps and scatter them without crushing the brown rice koji, creating the largest surface area, then cover it again with a slightly damp cloth and return it to the oven, allowing the koji to grow for another 36 hours while continuously monitoring temperature and humidity, but without the need to stir the brown rice. After an additional 36 hours of fermentation (for a total of 84 hours), fluffy white brown rice koji is obtained. The aroma of the koji becomes richer and closer to that of meat. With a single investment, one can create their own koji strain and continuously cultivate more koji.
⓬ When you touch it, your fingers will become dusted with powder, and when broken apart, it will release a dusty spore scent. Next, cut it into pieces and dry it at 45°C for ten hours. The koji rice must be dried to avoid contamination by other microorganisms. The baking paper need not be removed and can be placed directly in a ziplock bag; the best choice is to store it in the freezer. If the wooden tray has not been disinfected, the koji is easily contaminated by other microorganisms, and any growth of gray or other colored spores is inedible.
⓭ The usage of brown rice koji is similar to that of white rice koji, but its aroma is relatively richer. After breaking it apart, place it in a disinfected glass jar, add sea salt and mineral water, then add matured salt koji to speed up fermentation. Stir daily, and when it reaches a porridge-like consistency, it can be used for marinating meats and vegetables. This method brings out the sweetness and umami of the ingredients and can be used to make chickpea miso, eliminating the bean smell, with a flavor comparable to traditional soybean miso. For detailed methods, refer here:
Chickpea Miso https://beanpanda.com/156242


