吉野家:難道是你把牛丼醬汁的配方泄露出去的 Yoshinoya: Did you leak the recipe for their beef bowl sauce⁉️
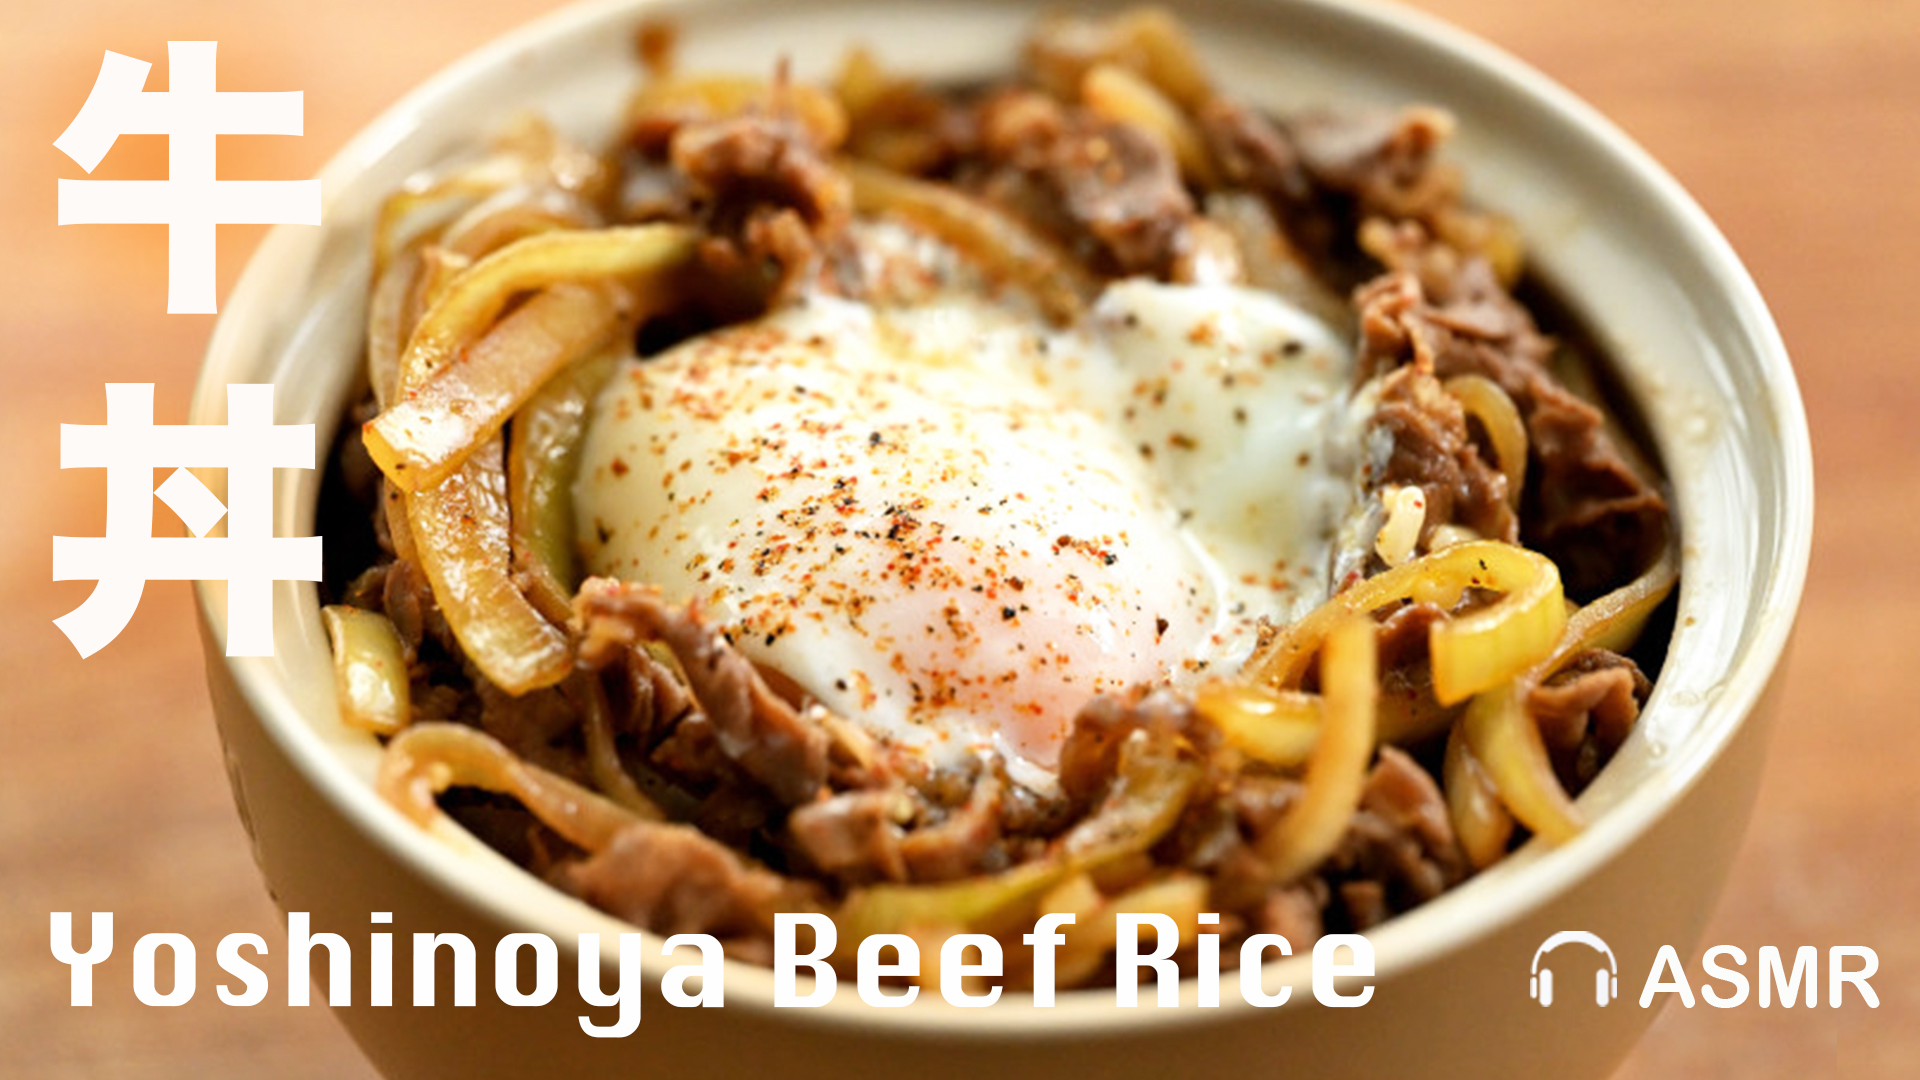
我享受快餐文化的的方便,復刻其美味又是另一種滿足。做飯並不是任勞任怨的煮飯工,它可以改變你對生活的感受,用有靈魂的料理餵養你所愛的人。好吃的牛丼飯,醬汁是靈魂,還有水汪汪半熟的溫泉蛋,撒上七味粉。
自製七味粉的做法,食譜在這裡 https://www.beanpanda.com/54317
溫泉蛋是將雞蛋放在天然溫泉中,利用近 70°C的溫泉水,將雞蛋加熱至半熟的狀態。其蛋白半透明果凍狀,蛋黃呈現流動狀態。溫泉蛋有別於溏心蛋,溏心蛋外熟內生,蛋白白色固態,蛋黃半熟糊狀
材料
- 火鍋肥牛肉 400 g (安格斯肥牛味道會更好)
- 洋蔥 Onion 1 個
- 仿吉野家牛丼汁 45 ml
- 溫泉蛋 1 顆
- 雙蒸米酒 Chinese Rice Wine 15 ml (1 大匙) 炒牛肉時加入
自製牛丼汁
- 釀造醬油 Soy Sauce 120 ml (傳統的純釀醬油鹹味不會太霸道,味道較鮮。若用超巿最常見的速釀製法或混合醬油,鹹味較刻版和重鹽,可以減量)
- 3 年窖藏釀造黑醋 Chinese Black Vinegar30 ml
- 原蔗糖 Demerara Raw Cane Sugar 22 g
- 雙蒸米酒 Chinese Rice Wine 15 ml (1 大匙)
- 鹽麴 Shio Koji 1 大匙
- 清水 Water 300 ml
【溫泉蛋♦做法】
1. 從冰箱直接取出雞蛋,不用退冰,為了避免蛋殼在加熱過程中,因溫度變化而破裂,用刺蛋器輕輕一按,在雞蛋「鈍端」刺一個小洞,咔嚓一下便開了一個小洞
2. 不同品牌的養生壼溫度設定有差,有些品牌可設定水溫 65°C,有些只能設定恒溫60或70°C。恒溫設定65°C 做法超簡單,冰雞蛋室溫水下鍋,加熱至65°C,開始計時 15 分鐘,起鍋
3. 設定恒溫60或70°C的做法:室溫水下鍋,不要用熱水
4. 用夾子或濾網勺輕輕放入冰雞蛋,1L 清水最多不超過 4 顆,雞蛋之間要分開避免碰撞
5. 第一次製作可用溫度計檢查養生壼溫度是否準確,水溫加熱至 65°C,開始計時 15 分鐘,期間水溫繼續上升到68°C,立刻下調設定至60°C,不要讓水溫上升超過 69°C,完成後立刻取出雞蛋,放進預先準備好的冰水裡,降溫 5 分鐘,觸摸時不燙即可打開
蛋黃在 65 ~ 70°C 凝固,蛋白在58°C開始凝固,80℃完全凝固。要做蛋黃不凝固的溫泉蛋,水溫要保持在 65~68°C 之間。
6. 我認為溫泉蛋成功的第一要點是控制水溫。看看水溫 68°C 和 70°C 的分別
- 68°C20分鐘:煮的時間雖較長,但蛋黃仍然未凝固,多碰觸幾下便流出蛋黃
- 70°C 15分鐘:蛋黃已經半凝固,蛋白成白色果凍狀,蛋黃很結實,翻幾次也沒破裂
- 由此可見流動和凝固之間只相差 2°C,掌控溫度是第一要點
7. 雞蛋品種、大小、鍋具性能質材,都會影響溫泉蛋凝固的速度,若不確定溫泉蛋熟度是否剛好,時間到可先打一顆蛋試試看。看看以下3個情景:
- 若打開後部份蛋白仍然透明 表示未熟,餘下雞蛋可再加熱 1 ~ 2 分鐘
- 溫度不變 延長加熱 2 分鐘,蛋白成水汪汪的果凍狀,蛋黃呈現流動狀態,表示水溫恰當,以後用同一樣的電器和時間就會成功﹗
- 溫度不變 加熱時間延長 5 分鐘,蛋白果凍狀蛋黃凝固,表示煮蛋的時間過長,下次可減時 2~3 分鐘
【肥丁牛丼醬汁♦做法】
1. 小鍋裡放入清水、Demerara 原蔗糖、自製鹽麴、雙蒸米酒、釀造醬油、3 年窖藏釀造黑醋
2. 攪拌均勻,小火加熱至剛剛沸騰,讓米酒的酒精蒸發,熬煮後只留下酒香沒有酒精,起鍋,待稍涼後放入玻璃瓶,冰箱冷藏約 3 個月,隨時取用
【牛肉丼飯♦做法】
1. 洋蔥切段
2. 少許油,平均塗抹鍋面,中火加熱至看到油紋,但不要冒煙
3. 洋蔥先下鍋中火翻炒至半透明,炒洋蔥要有耐心,大火會焦但不甜,中火慢慢炒不停翻伴至引出甜味
4. 下肥牛肉薄片,1 大匙米酒,讓肥牛肉盡量接觸鍋面
5. 加入牛丼醬汁,醬汁下鍋後鍋面瞬間降溫,調至大火盡快收汁,快速翻炒約 1 分鐘
6. 醬汁裡的黑醋能增加肉的鮮香,撩撥味蕾增進食慾,黑醋和鹽麴會軟化牛肉組織,使肉質更細嫩,用這醬汁翻炒肥牛不會老,約 1 ~ 2 分鐘牛肉炒熟,醬汁變少但不用全乾,便可以起鍋了
7. 牛肉鋪在飯上,加入溫泉蛋,撒上自製七味粉,即可享用~
[:en]https://youtu.be/eTWS22_Z55w
I enjoy the convenience of fast food culture, but recreating its deliciousness is a different kind of satisfaction. Cooking is not just a mundane task; it can change your perception of life and nourish your loved ones with soulful dishes. A tasty beef bowl with its flavorful sauce, topped with a perfectly half-cooked onsen egg and sprinkled with shichimi powder.
Here’s a recipe for homemade shichimi powder, you can find the recipe here:
https://www.beanpanda.com/54317
An onsen egg is made by placing an egg in natural hot springs, utilizing the temperature of around 70°C to cook the egg to a semi-cooked state. The egg white becomes translucent and jelly-like, while the yolk remains runny. Unlike soft-boiled eggs, where the white is cooked and the yolk is runny, the onsen egg has a semi-solid white and a custard-like yolk.
Ingredients:
- 400g shabu-shabu beef (Angus beef for better flavor)
- 1 onion
- 45ml Gyudon sauce (imitation Yoshinoya beef bowl sauce)
- 1 onsen egg
- 15ml Chinese rice wine (1 tablespoon), added during beef stir-frying
Homemade Gyudon Sauce:
- 120ml soy sauce (traditional brewed soy sauce is less overpowering in flavor and more refreshing. If using commonly available chemically brewed or mixed soy sauce, reduce the amount of soy sauce as it tends to be saltier)
- 30ml Chinese black vinegar (3-year aged)
- 22g Demerara raw cane sugar
- 15ml Chinese rice wine (1 tablespoon)
- 1 tablespoon shio koji (salt koji)
- 300ml water
【Onsen Egg♦Instruction】
1. Take the eggs directly from the refrigerator without thawing. To prevent the eggshells from cracking due to temperature changes during heating, gently pierce a small hole in the “blunt end” of the egg using an egg pricker.
2. Different brands of sous vide machines may have different temperature settings. Some can be set at 65°C, while others only offer constant temperatures of 60°C or 70°C. For a sous vide machine set at a constant temperature of 65°C, place the eggs directly from the refrigerator into room temperature water in a pot. Heat the water to 65°C and start the timer for 15 minutes. Remove the eggs from the water.
3. For a sous vide machine set at a constant temperature of 60°C or 70°C, place the eggs directly from the refrigerator into room temperature water in a pot. Do not use hot water.
4. Gently place the chilled eggs into the pot using tongs or a slotted spoon. For 1 liter of water, do not exceed 4 eggs, and make sure the eggs are not touching each other to avoid collisions.
5. For the first attempt, use a thermometer to check if the sous vide machine’s temperature is accurate. Heat the water to 65°C and start the timer for 15 minutes. During this time, the water temperature will continue to rise to 68°C. Immediately adjust the temperature setting to 60°C without allowing the water temperature to exceed 69°C. Once the eggs are cooked, remove them from the water and place them in a prepared bowl of ice water to cool for 5 minutes. The eggs are ready when they are no longer hot to the touch.
The yolk sets between 65-70°C, while the egg white starts to set at 58°C and is completely set at 80°C. To achieve an onsen egg with a runny yolk, the water temperature should be maintained between 65-68°C.
6. I believe the key to successful onsen eggs is temperature control. Take a look at the difference between water temperatures of 68°C and 70°C:
- 20 minutes at 68°C: The eggs are cooked for a longer time, but the yolk is still runny. With a slight touch, the runny yolk flows out.
- 15 minutes at 70°C: The yolk is semi-set, the egg white becomes jelly-like, and the yolk is firm. Even when flipped a few times, it doesn’t break.
As you can see, there is only a 2°C difference between a runny and semi-set yolk. Temperature control is crucial.
7. The variety of eggs, their size, and the performance of the cooking equipment can affect the cooking time for onsen eggs. If you are unsure about the doneness of the onsen egg, you can start by testing one egg. Here are three scenarios:
- If some parts of the egg white are still transparent when opened, it means it is undercooked. You can heat the remaining eggs for an additional 1-2 minutes.
- If the temperature remains the same, extend the cooking time by 2 minutes. The egg whitecontinues to cook even after being removed from the water bath, so it’s better to slightly undercook it if you prefer a runny yolk.
- If the yolk is fully solidified, it means it is overcooked. Reduce the cooking time for the remaining eggs.
【Beef Bowl Sauce♦Instruction】
1. 小鍋裡放入清水、Demerara 原蔗糖、自製鹽麴、雙蒸米酒、釀造醬油、3 年窖藏釀造黑醋
2. 攪拌均勻,小火加熱至剛剛沸騰,讓米酒的酒精蒸發,熬煮後只留下酒香沒有酒精,起鍋,待稍涼後放入玻璃瓶,冰箱冷藏約 3 個月,隨時取用
【Beef Bowl Sauce♦Instruction】
1. Slice the onion thinly.
2. Heat a frying pan over medium heat and add a small amount of oil. Sauté the sliced onions until they become translucent and slightly caramelized.
3. Add the shabu-shabu beef slices to the pan and stir-fry until they are cooked to your desired doneness. You can add a tablespoon of Chinese rice wine to enhance the flavor while stir-frying the beef.
4. Once the beef is cooked, add the gyudon sauce to the pan and stir to coat the beef and onions evenly. Let it simmer for a minute or two to allow the flavors to meld together.
5. While the beef and onions are simmering, prepare the onsen egg. Gently crack the egg into a bowl or plate, making sure not to break the yolk.
6. Carefully place the onsen egg on top of the beef and onions in the pan. Cover the pan with a lid and let it cook for about 1 minute to warm up the egg without fully cooking it.
7. Remove the lid and turn off the heat. The onsen egg should be slightly runny but warmed through.
8. Serve the gyudon beef bowl by placing a portion of rice in a bowl and topping it with the beef, onions, and onsen egg. Sprinkle some shichimi powder on top for an extra kick of flavor.
9. Enjoy your homemade gyudon beef bowl with onsen egg![:]


